
DIY iMac 27"
DIY: We build an iMac 27" with M1 processorIdea
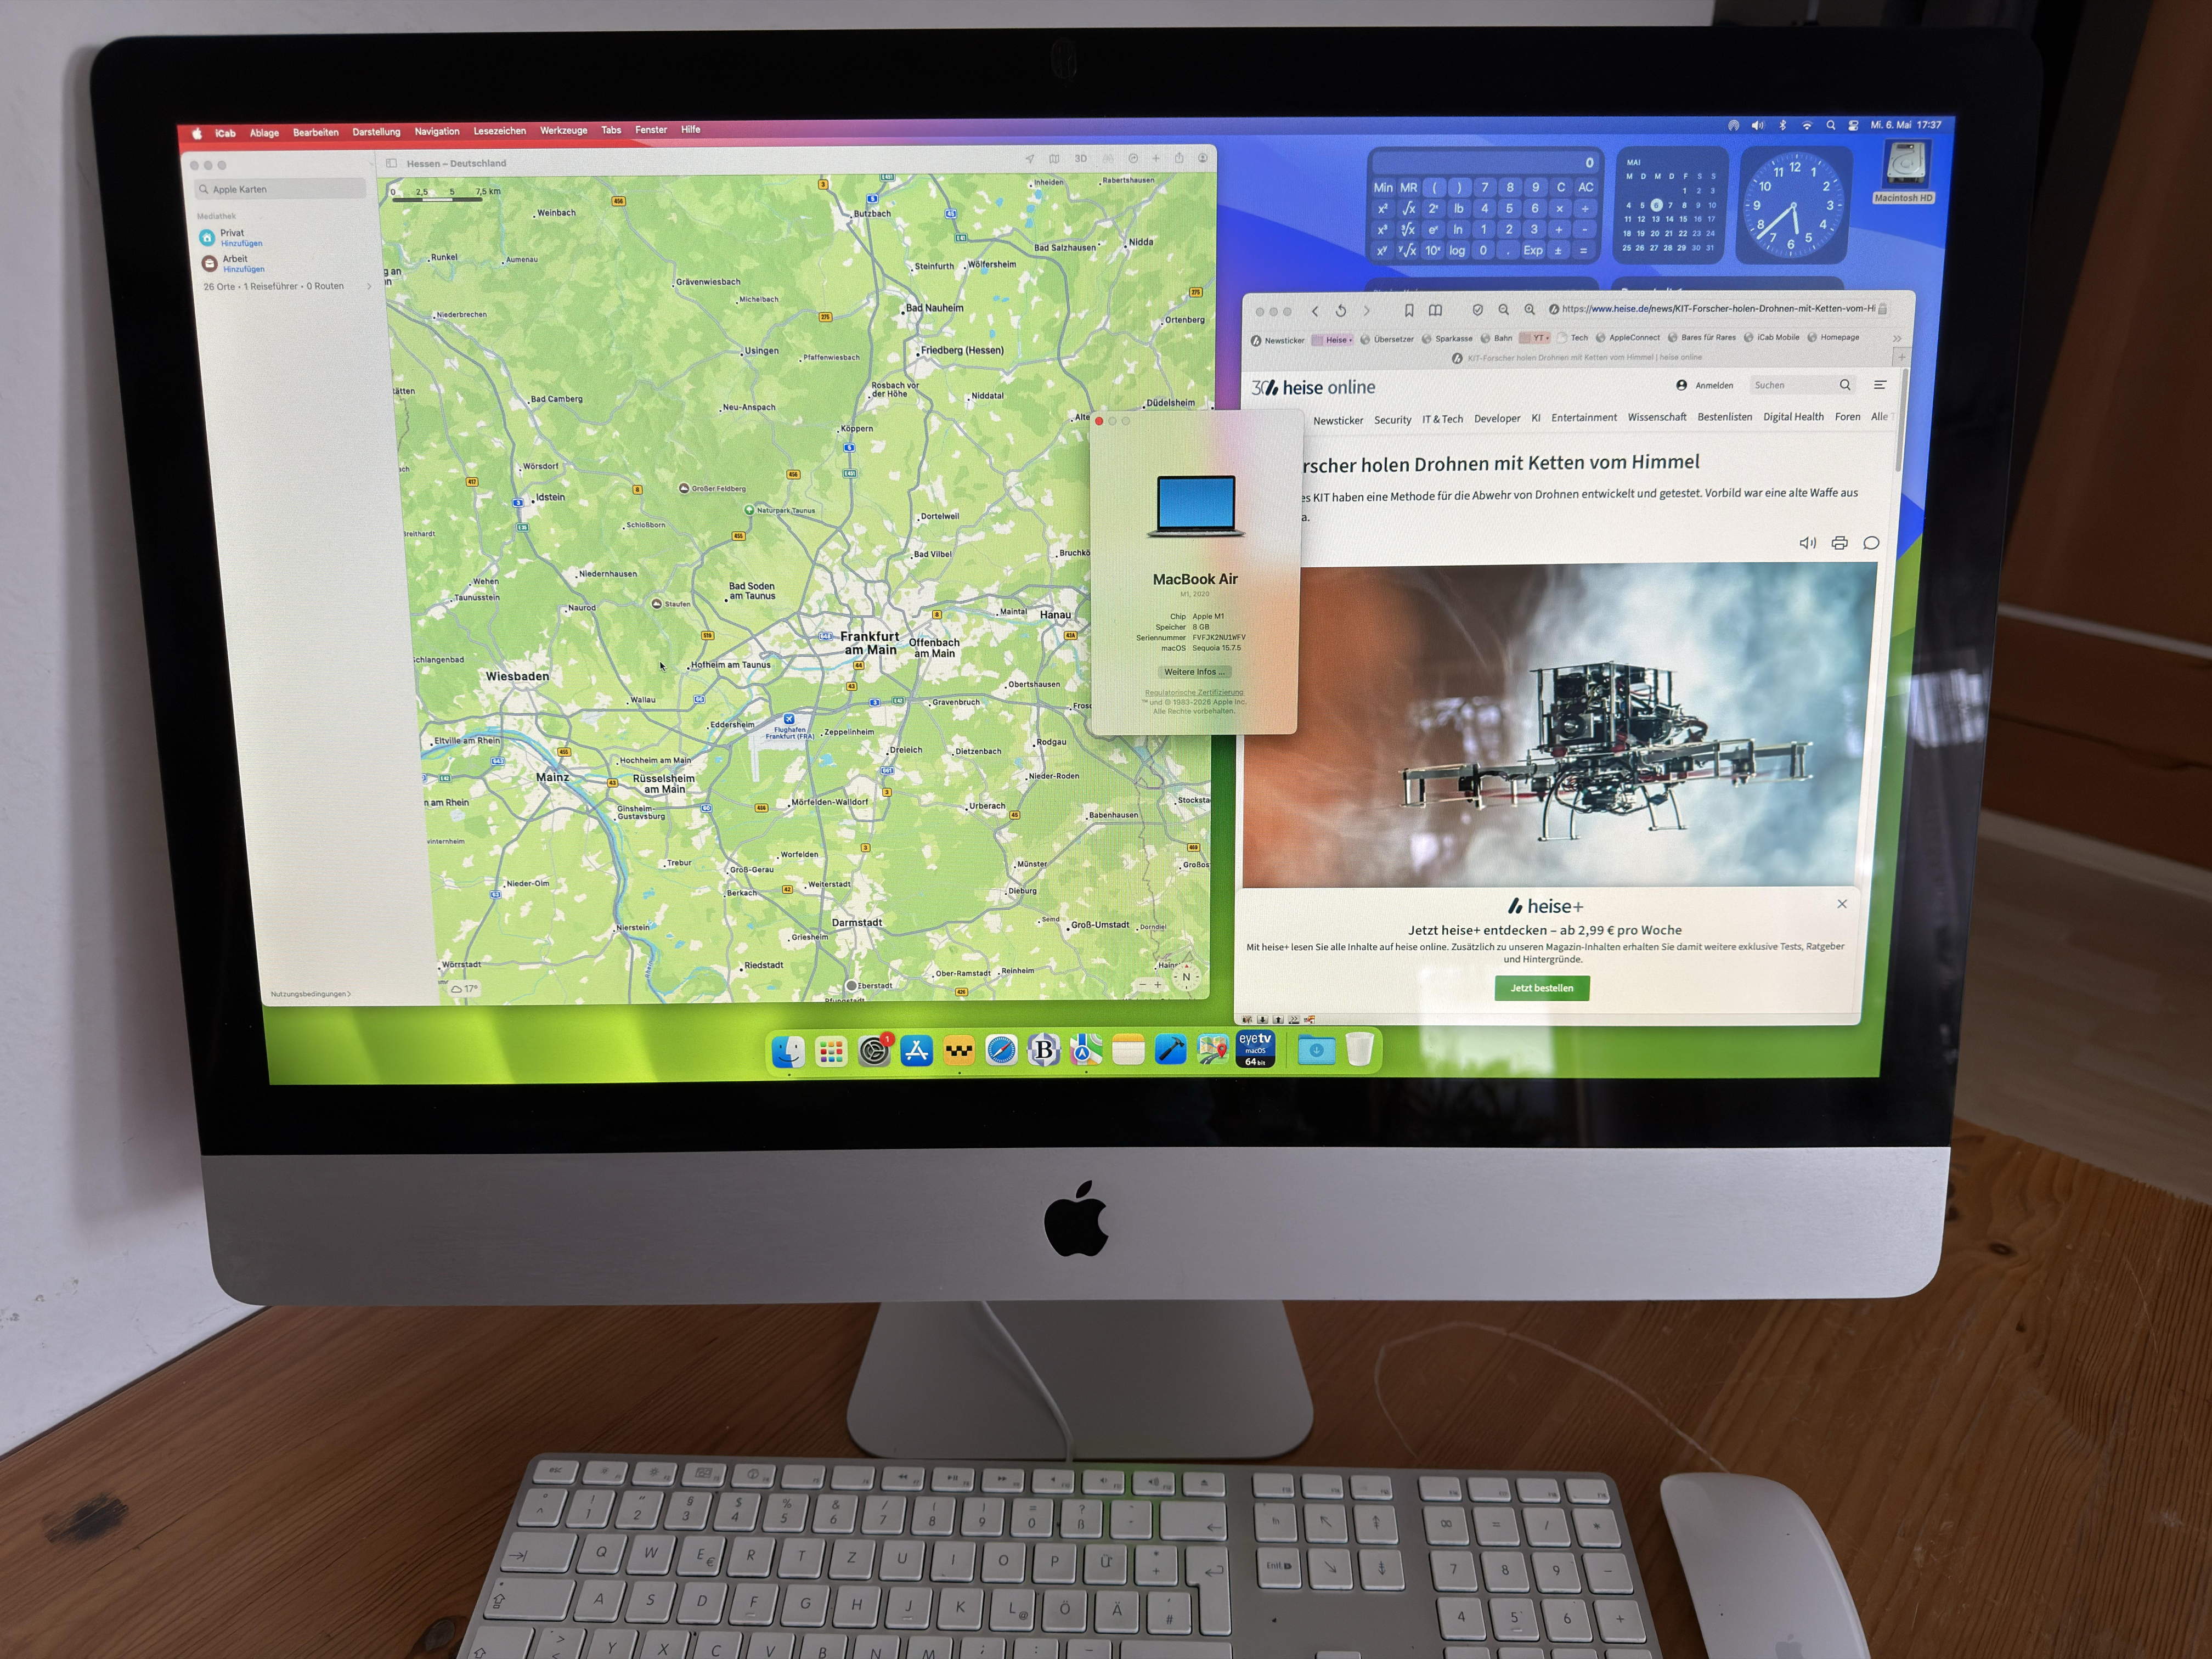 The DIY iMac in action
As a software developer for MacOS and iOS, I already use the Mac Studio M4 Max, a computer that has everything I need. Nevertheless, it is sometimes convenient to have a second computer. This should not cost much, and since I like to "tinke", the idea came up to simply build a new Mac myself - from (partially) defective out-of-life Macs that are easy and inexpensive to get.
The DIY iMac in action
As a software developer for MacOS and iOS, I already use the Mac Studio M4 Max, a computer that has everything I need. Nevertheless, it is sometimes convenient to have a second computer. This should not cost much, and since I like to "tinke", the idea came up to simply build a new Mac myself - from (partially) defective out-of-life Macs that are easy and inexpensive to get.
There is already a well-known DIY project in which an old iMac is converted into an external display. All components are taken out of the iMac except for the display panel and a new display controller is installed (these are available for virtually all panels ever used by Apple in the iMac). The display controller provides the necessary connections for an external display such as HDMI, Display Port, etc.
My idea is to equip the iMac not only with a new display controller, but also to install the logic board of a more modern Mac (with Apple silicon processor). The old iMac is thus refreshed with modern components and reusable.
Planning
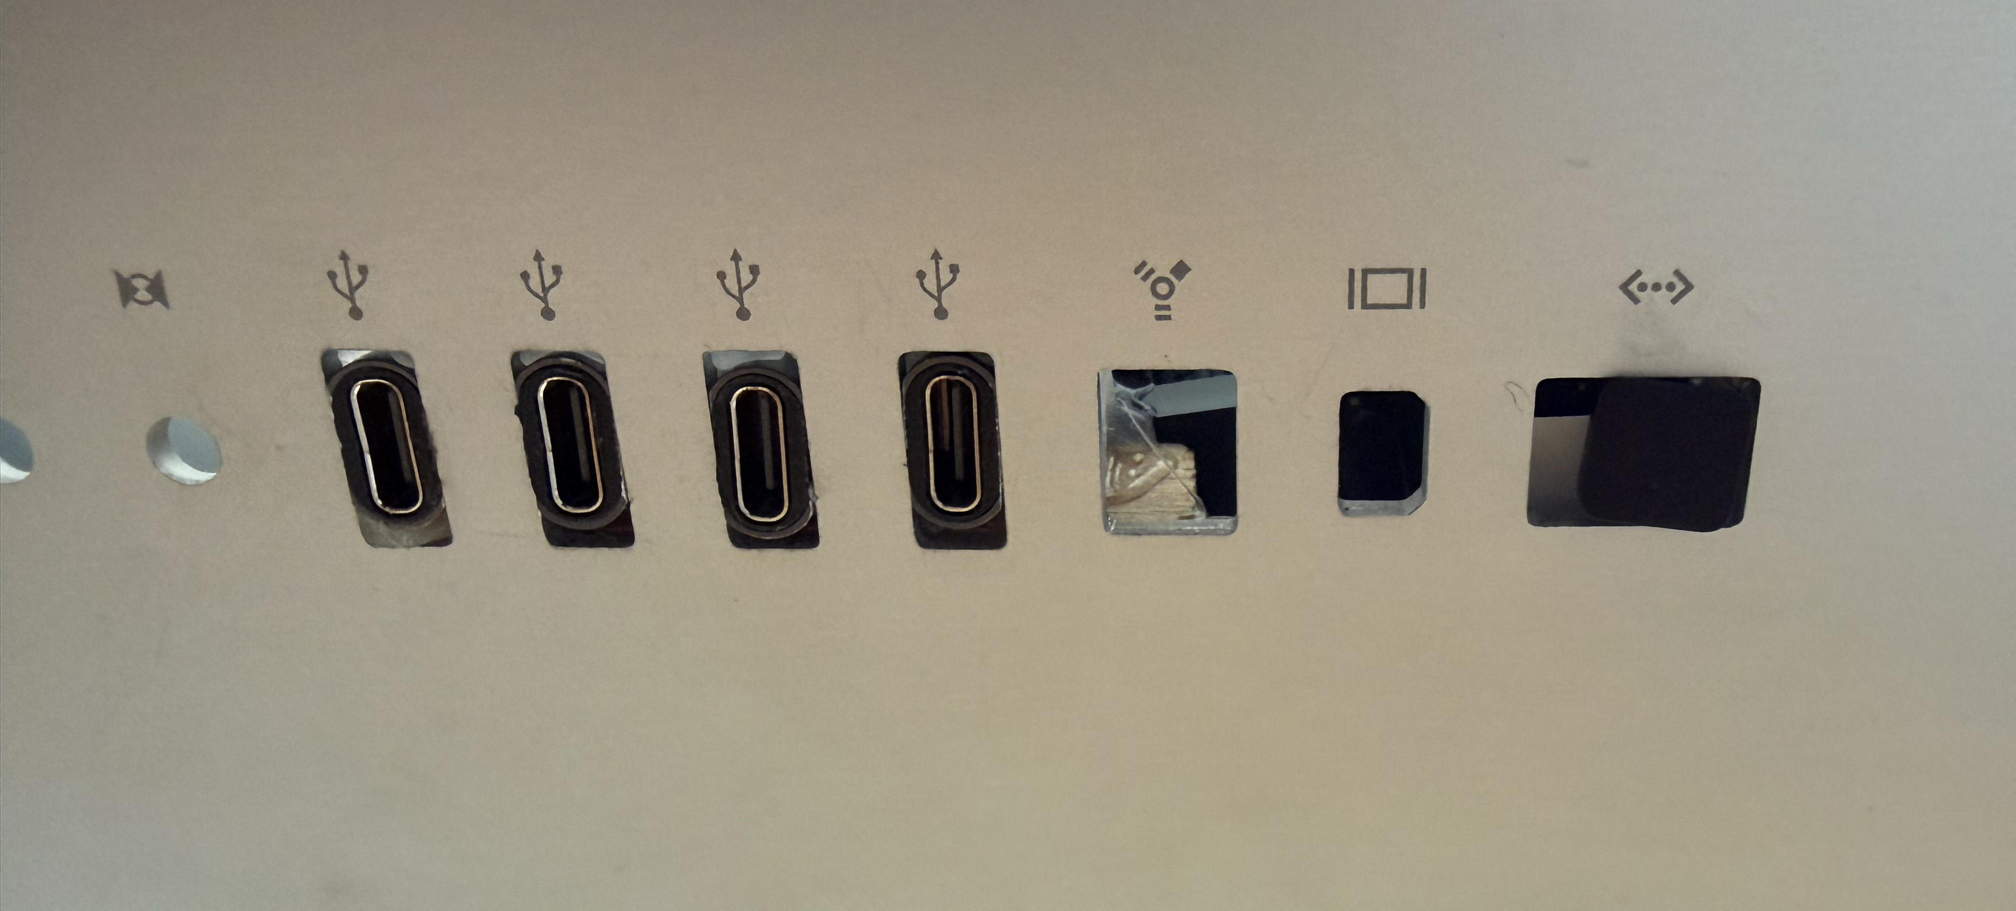 The back with 4 USB-C ports. The Touch ID sensor is accessible via the former Ethernet port
Old or defective iMacs 27" with intact display are available for a few euros on the second-hand market. You should pay attention to the model, because there are old models of the iMac 27" with optical drive and the newer variants without it (however the newer models do have 5K displays). From the front, both variants look identical, but the old models are much thicker, which makes the installation of the required components easier. That's why I chose one of these older 27" iMac models.
The back with 4 USB-C ports. The Touch ID sensor is accessible via the former Ethernet port
Old or defective iMacs 27" with intact display are available for a few euros on the second-hand market. You should pay attention to the model, because there are old models of the iMac 27" with optical drive and the newer variants without it (however the newer models do have 5K displays). From the front, both variants look identical, but the old models are much thicker, which makes the installation of the required components easier. That's why I chose one of these older 27" iMac models.
Almost any mobile Mac and Mac mini with Apple silicon can be used for installation into the iMac case. Their logic boards are so small that they can easily find space. However, "desktop" Macs like the Mac mini practically never break down due to lack of mechanical load, which is why they are rarely available for a reasonable price on the second-hand market. The situation is different with mobile Macs, such as a MacBook Air. Here it happens more often that after years of opening/closing the lid, the connection cable between the display and the keyboard unit breaks at some point due to the mechanical load and the display fails to work. Therefore, older MacBooks are quite often offered with a defective display on the second-hand market. Since you can still operate these Macs on an external displays, many of the offers are still overpriced, but you can still find some with a reasonable price. I bought an old MacBook Air M1 with a defective display.
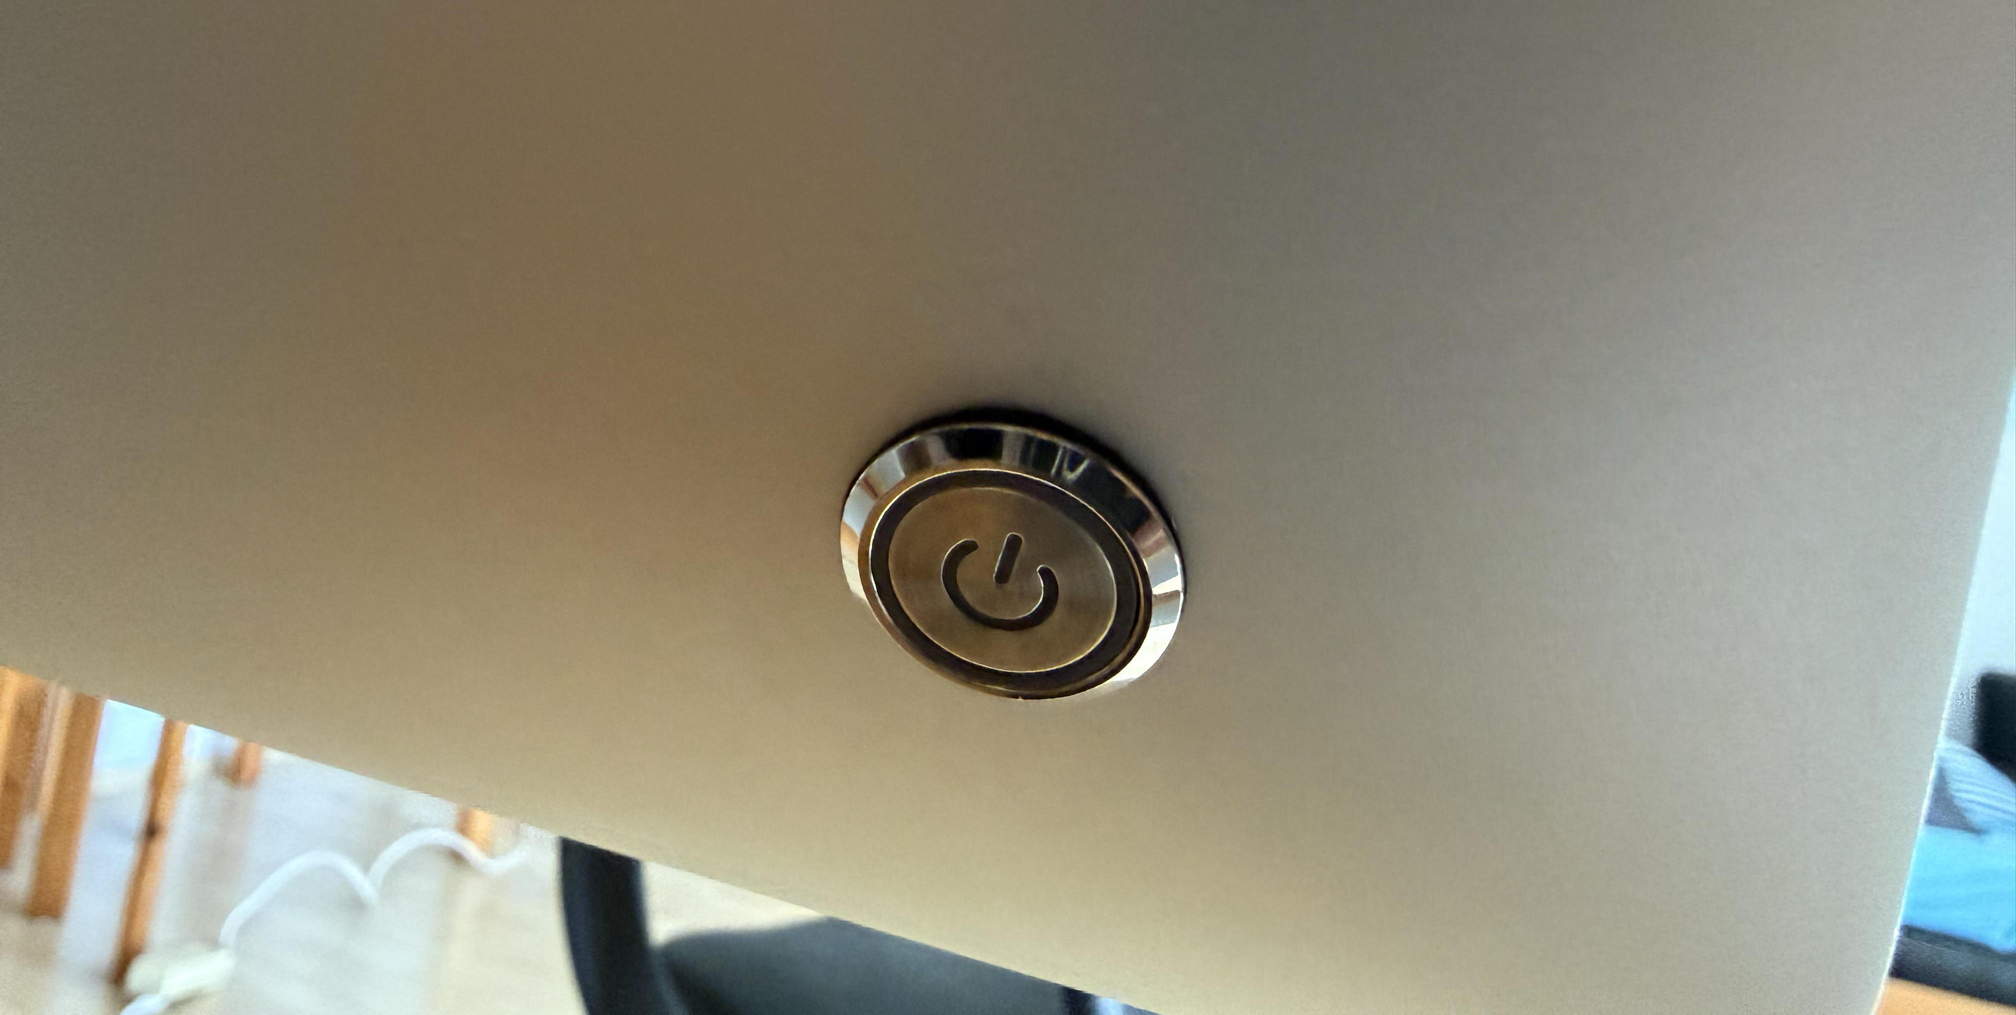 The new on/off switch
To find the right display controller, you must first disassemble the iMac and look for the type plate on the back of the display panel. You can buy a suitable controller on Amazon, Ebay or AliExpress, practically always the dealer is located in China - so shipping might take a while.
The new on/off switch
To find the right display controller, you must first disassemble the iMac and look for the type plate on the back of the display panel. You can buy a suitable controller on Amazon, Ebay or AliExpress, practically always the dealer is located in China - so shipping might take a while.
Since the MacBook Air has only two USB ports and one of these must be used for the power supply, the other is connected to the display controller, there would be no further connections available for peripherals left. Therefore, a USB hub was also planned to be integrate into the iMac. It can be used to power the MacBook and there are connections available for peripherals. The choice fell on a USB-C hub with USB power supply and 4 USB connections. In addition, I need some USB-C extension cables to lay the 4 USB ports of the hub to the housing cut-outs of the former USB-A ports of the old iMac. With this, the new DIY iMac will be equipped with 4 USB-C ports for peripherals that are accessible exactly where the old iMac had its USB-A ports.
The new display controller requires a power supply with 12V and 4-6W. The MacBook's logic board is powered via USB and requires a corresponding USB power supply. According to Apple, the MacBook Air requires a maximum of about 40W in operation (including display and battery charging, both of which are omitted in the iMac). That is, the USB power supply should be dimensioned accordingly.
The switch of the old iMac can not be used again, as it cannot switch 220V. So a new on/off switch is needed as well.
Costs
The complete list of individual parts with costs and source of supply:
| Product | State | Source | Price |
|---|---|---|---|
| iMac 27" | Doesn't boot anymore, display OK | Kleinanzeigen (second-hand market) | 35€ |
| MacBook Air M1 | Defective display | Kleinanzeigen (second-hand market) | 150€ |
| Display Controller | AliExpress | 13€ | |
| Power Supply 12V/6W | Amazon | 8€ | |
| USB Power Supply 40W | Amazon | 10€ | |
| USB-C Hub (4x, PD) | Amazon | 15€ | |
| 4* USB-C extension cables | Amazon | 20€ | |
| HDMI-to-USB cable | Amazon | 8€ | |
| On-/Off switch | Amazon | 2€ | |
| Total | 261€ | ||
The total costs can be slightly reduced, as no longer needed but still intact components (battery, keyboard, trackpad, RAM) can still be sold.
Required tool
To disassemble iMac and MacBook Air, T8, T4, T3 and P5 screwdrivers are required.Also useful are two small suction cups to remove the display glass of the iMac.
If you have a 3D printer, you can print custom-made installation aids with which the components can be attached to the iMac case. Otherwise, a hot glue gun and small wooden or plastic pins which work as spacers and insulating tape can be used to hold all components and cables in place.
Disassemble computers
iMac
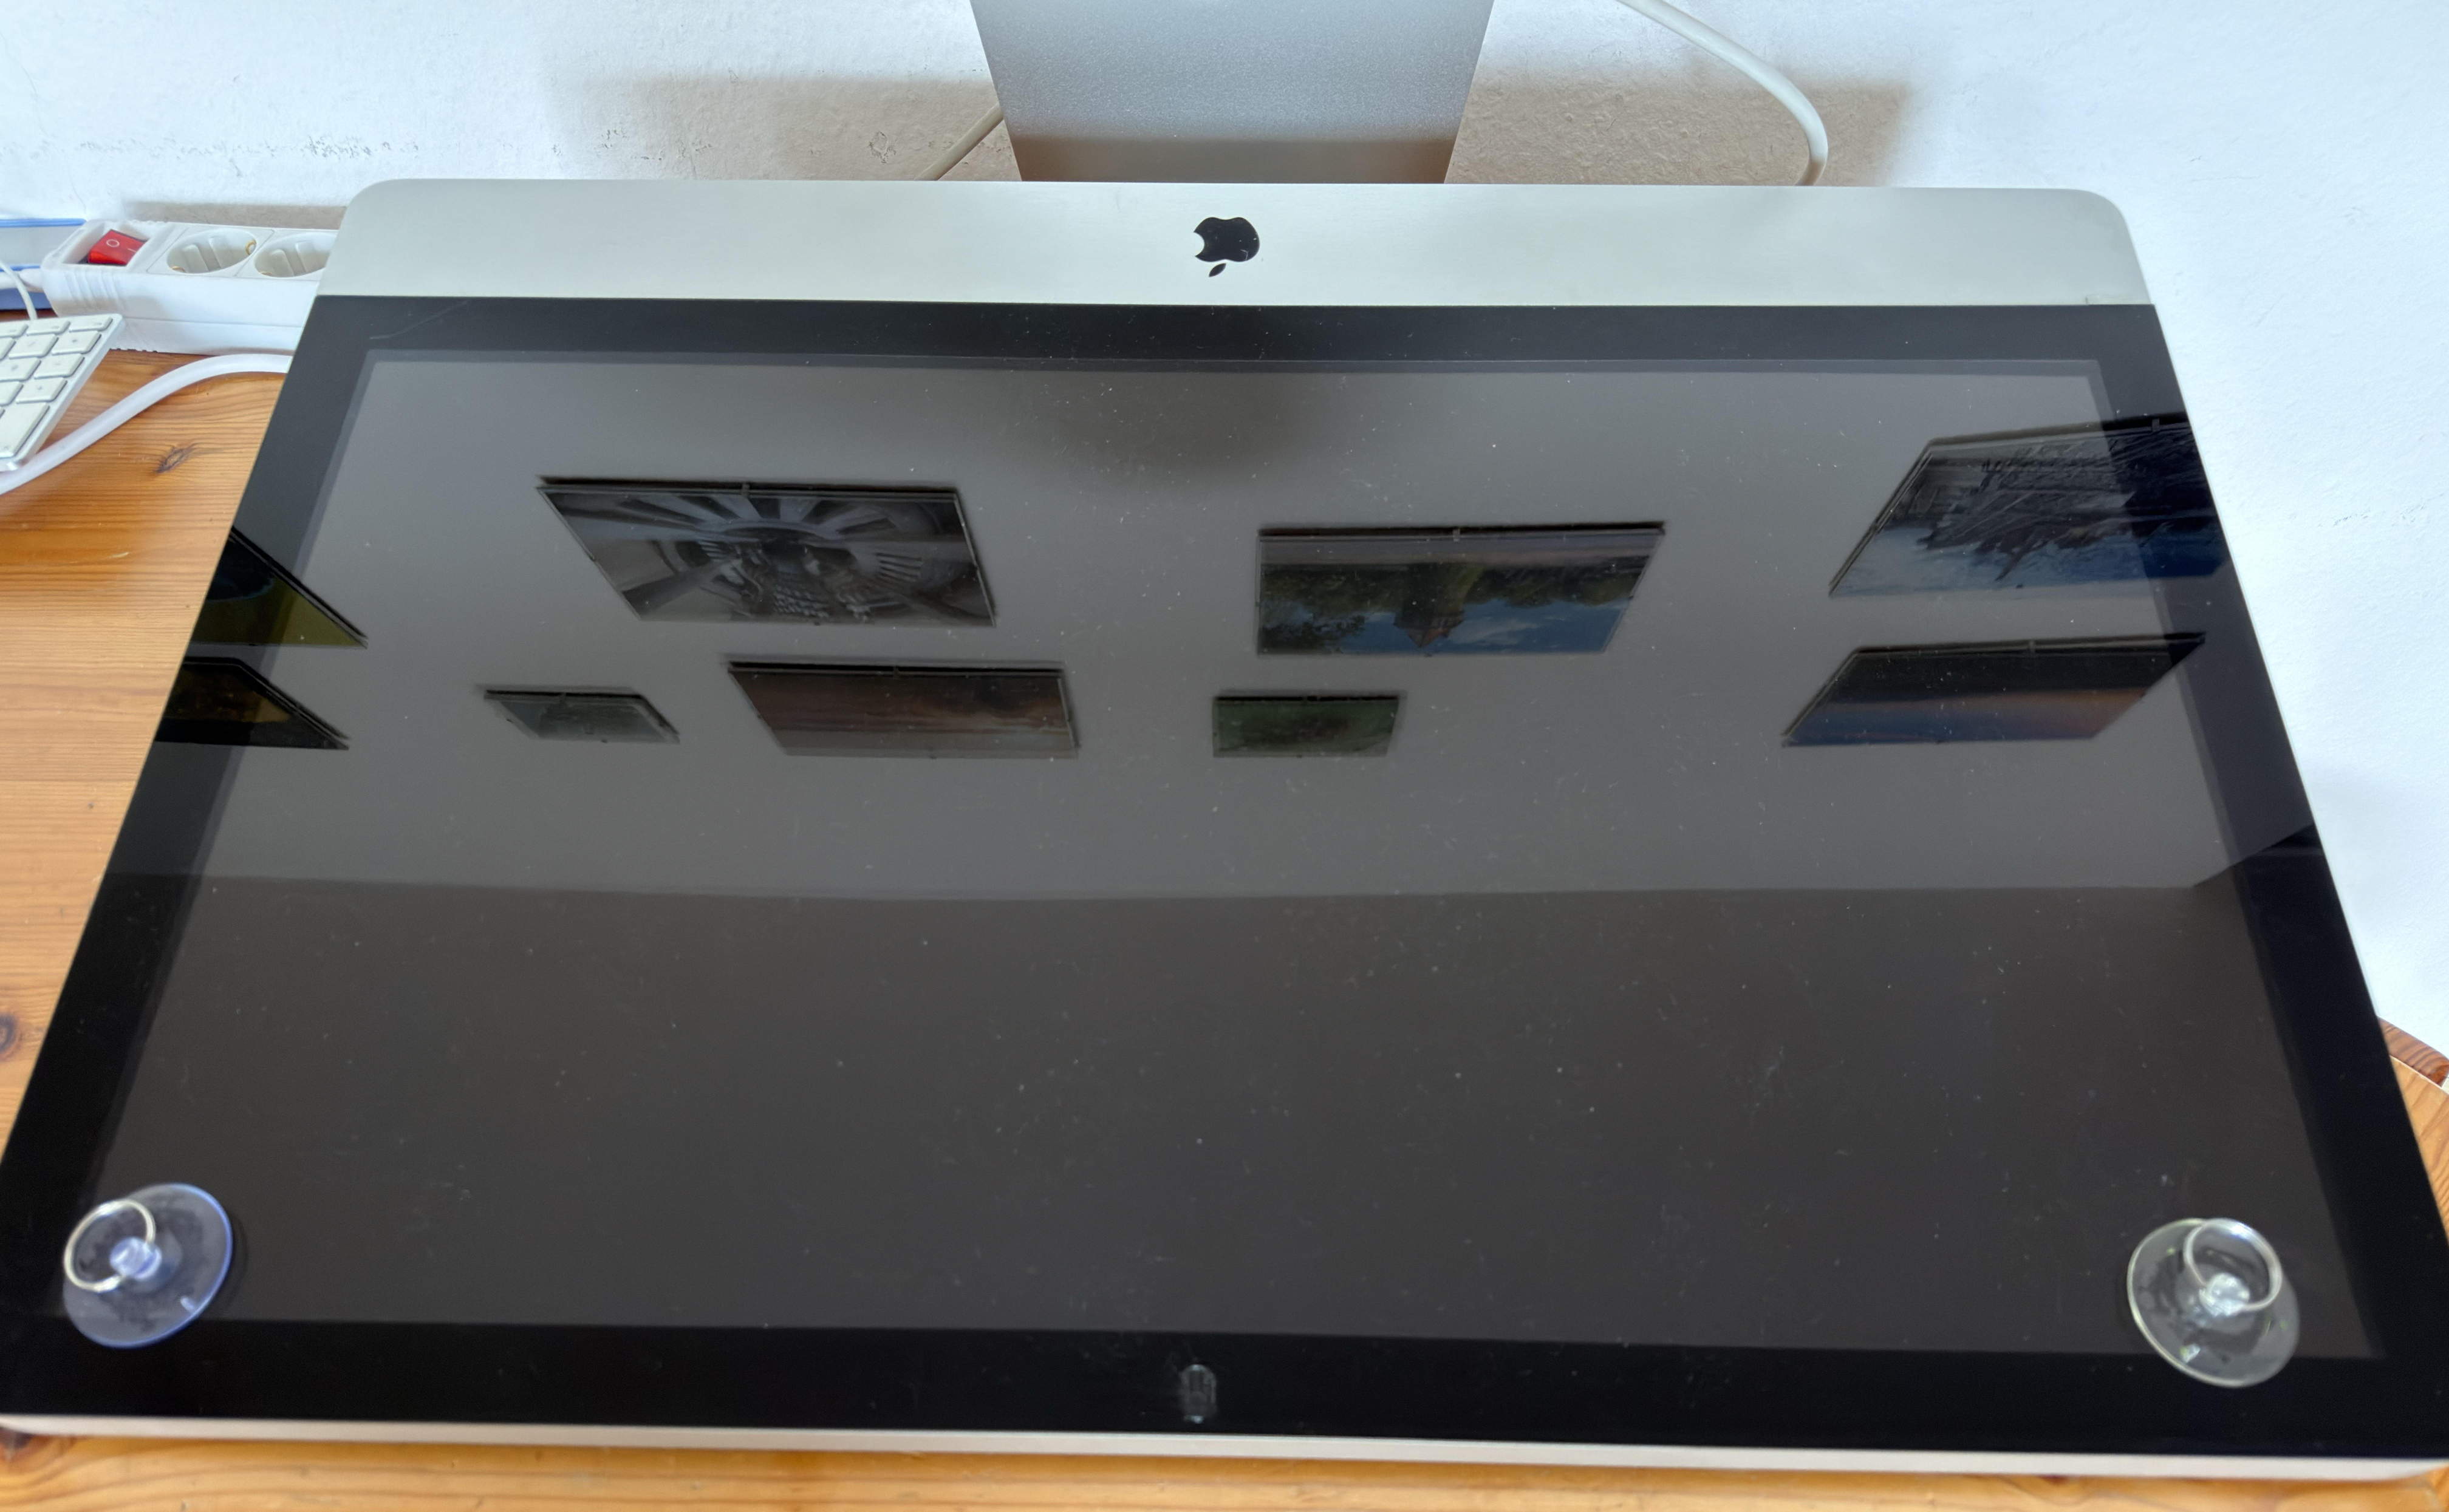 Lift the glass pane with the help of suction cups
Disassembling and core removal of the iMac is quite simple. You can hardly go wrong here. In principle, you only have to be careful when removing the display, because that is still needed.
Lift the glass pane with the help of suction cups
Disassembling and core removal of the iMac is quite simple. You can hardly go wrong here. In principle, you only have to be careful when removing the display, because that is still needed.
The glass pane is held at the bottom via latches and at the top by magnets. Therefore, you must first lift the glass pane at the top with suction cups to detach it from the magnets, then you can simply lift them out. To do this, it is best to place the iMac on its back, with the glass pane facing up. The two suction cups are placed on the left and right at the top of the iMac. Normally, the glass pane should come off quite easily by lifting both suction cups evenly at the same time. The weight of the iMac should hold it down while the glass pane detaches from the magnets.
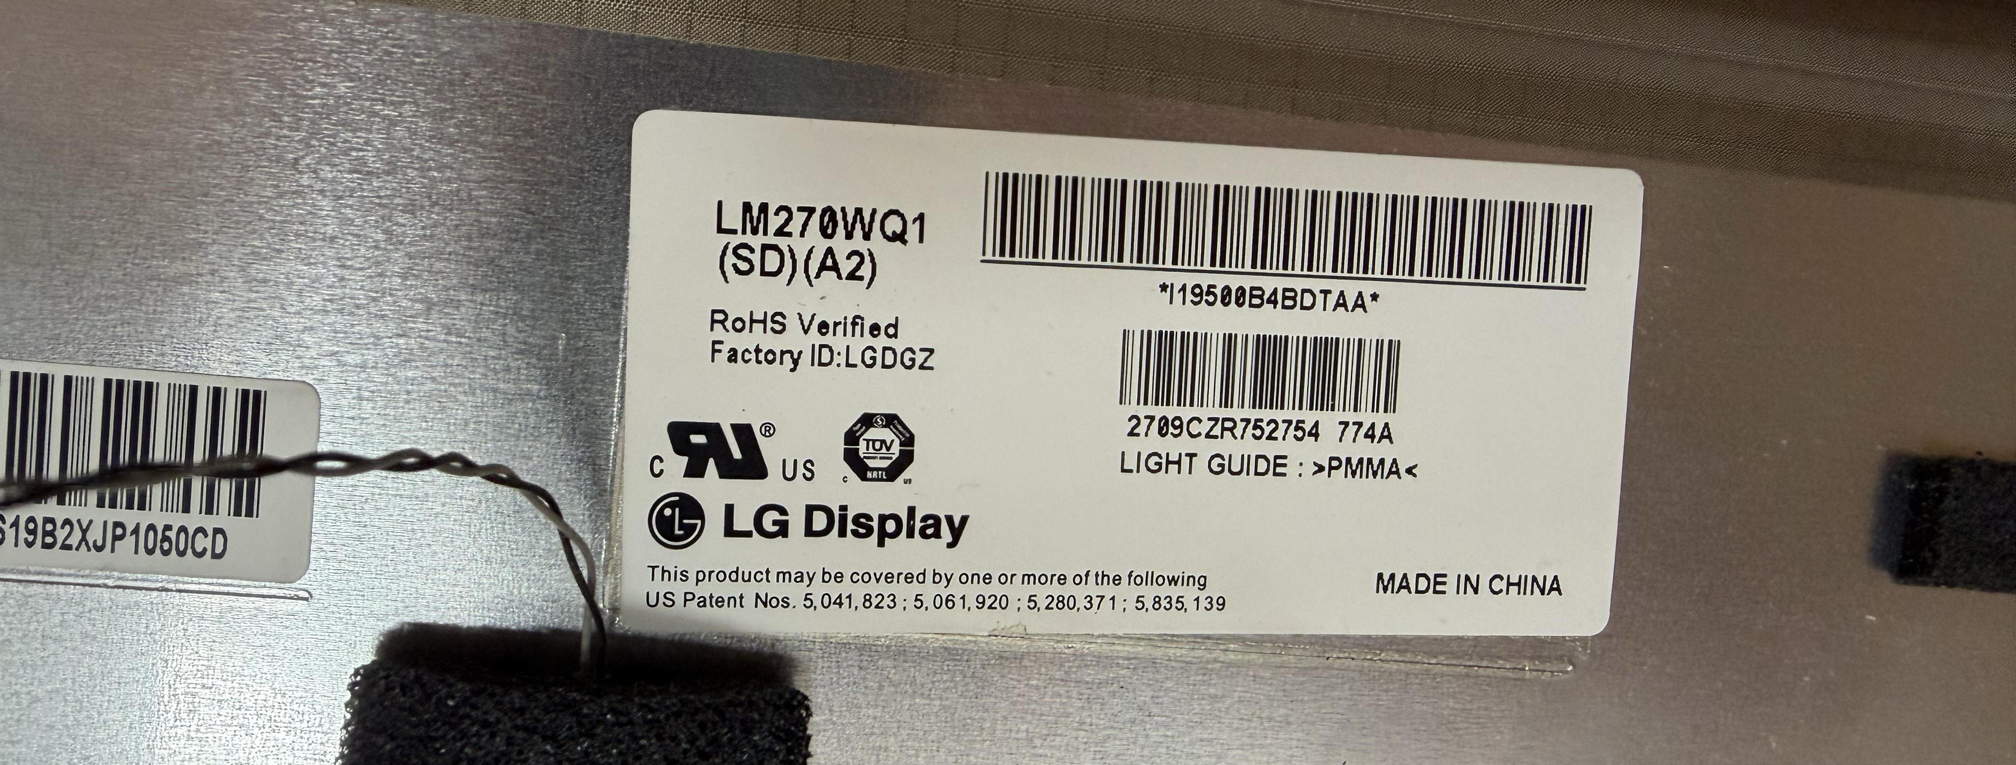 The nameplate with the model number "LM270WQ1-SDA2" to which the display controller must match
The display is screwed with 8 T8 screws (4 each left and right). After all the screws are loosened, you can lift it. But not too far, because it is still connected with some cables to the boards, these still have to be released by pulling the corresponding plugs. Depending on the iMac model, the connections are slightly different. Therefore you might checkout the ifixit site, which provides instructions for disassembling and replacing components for almost all iMac models.
The nameplate with the model number "LM270WQ1-SDA2" to which the display controller must match
The display is screwed with 8 T8 screws (4 each left and right). After all the screws are loosened, you can lift it. But not too far, because it is still connected with some cables to the boards, these still have to be released by pulling the corresponding plugs. Depending on the iMac model, the connections are slightly different. Therefore you might checkout the ifixit site, which provides instructions for disassembling and replacing components for almost all iMac models.
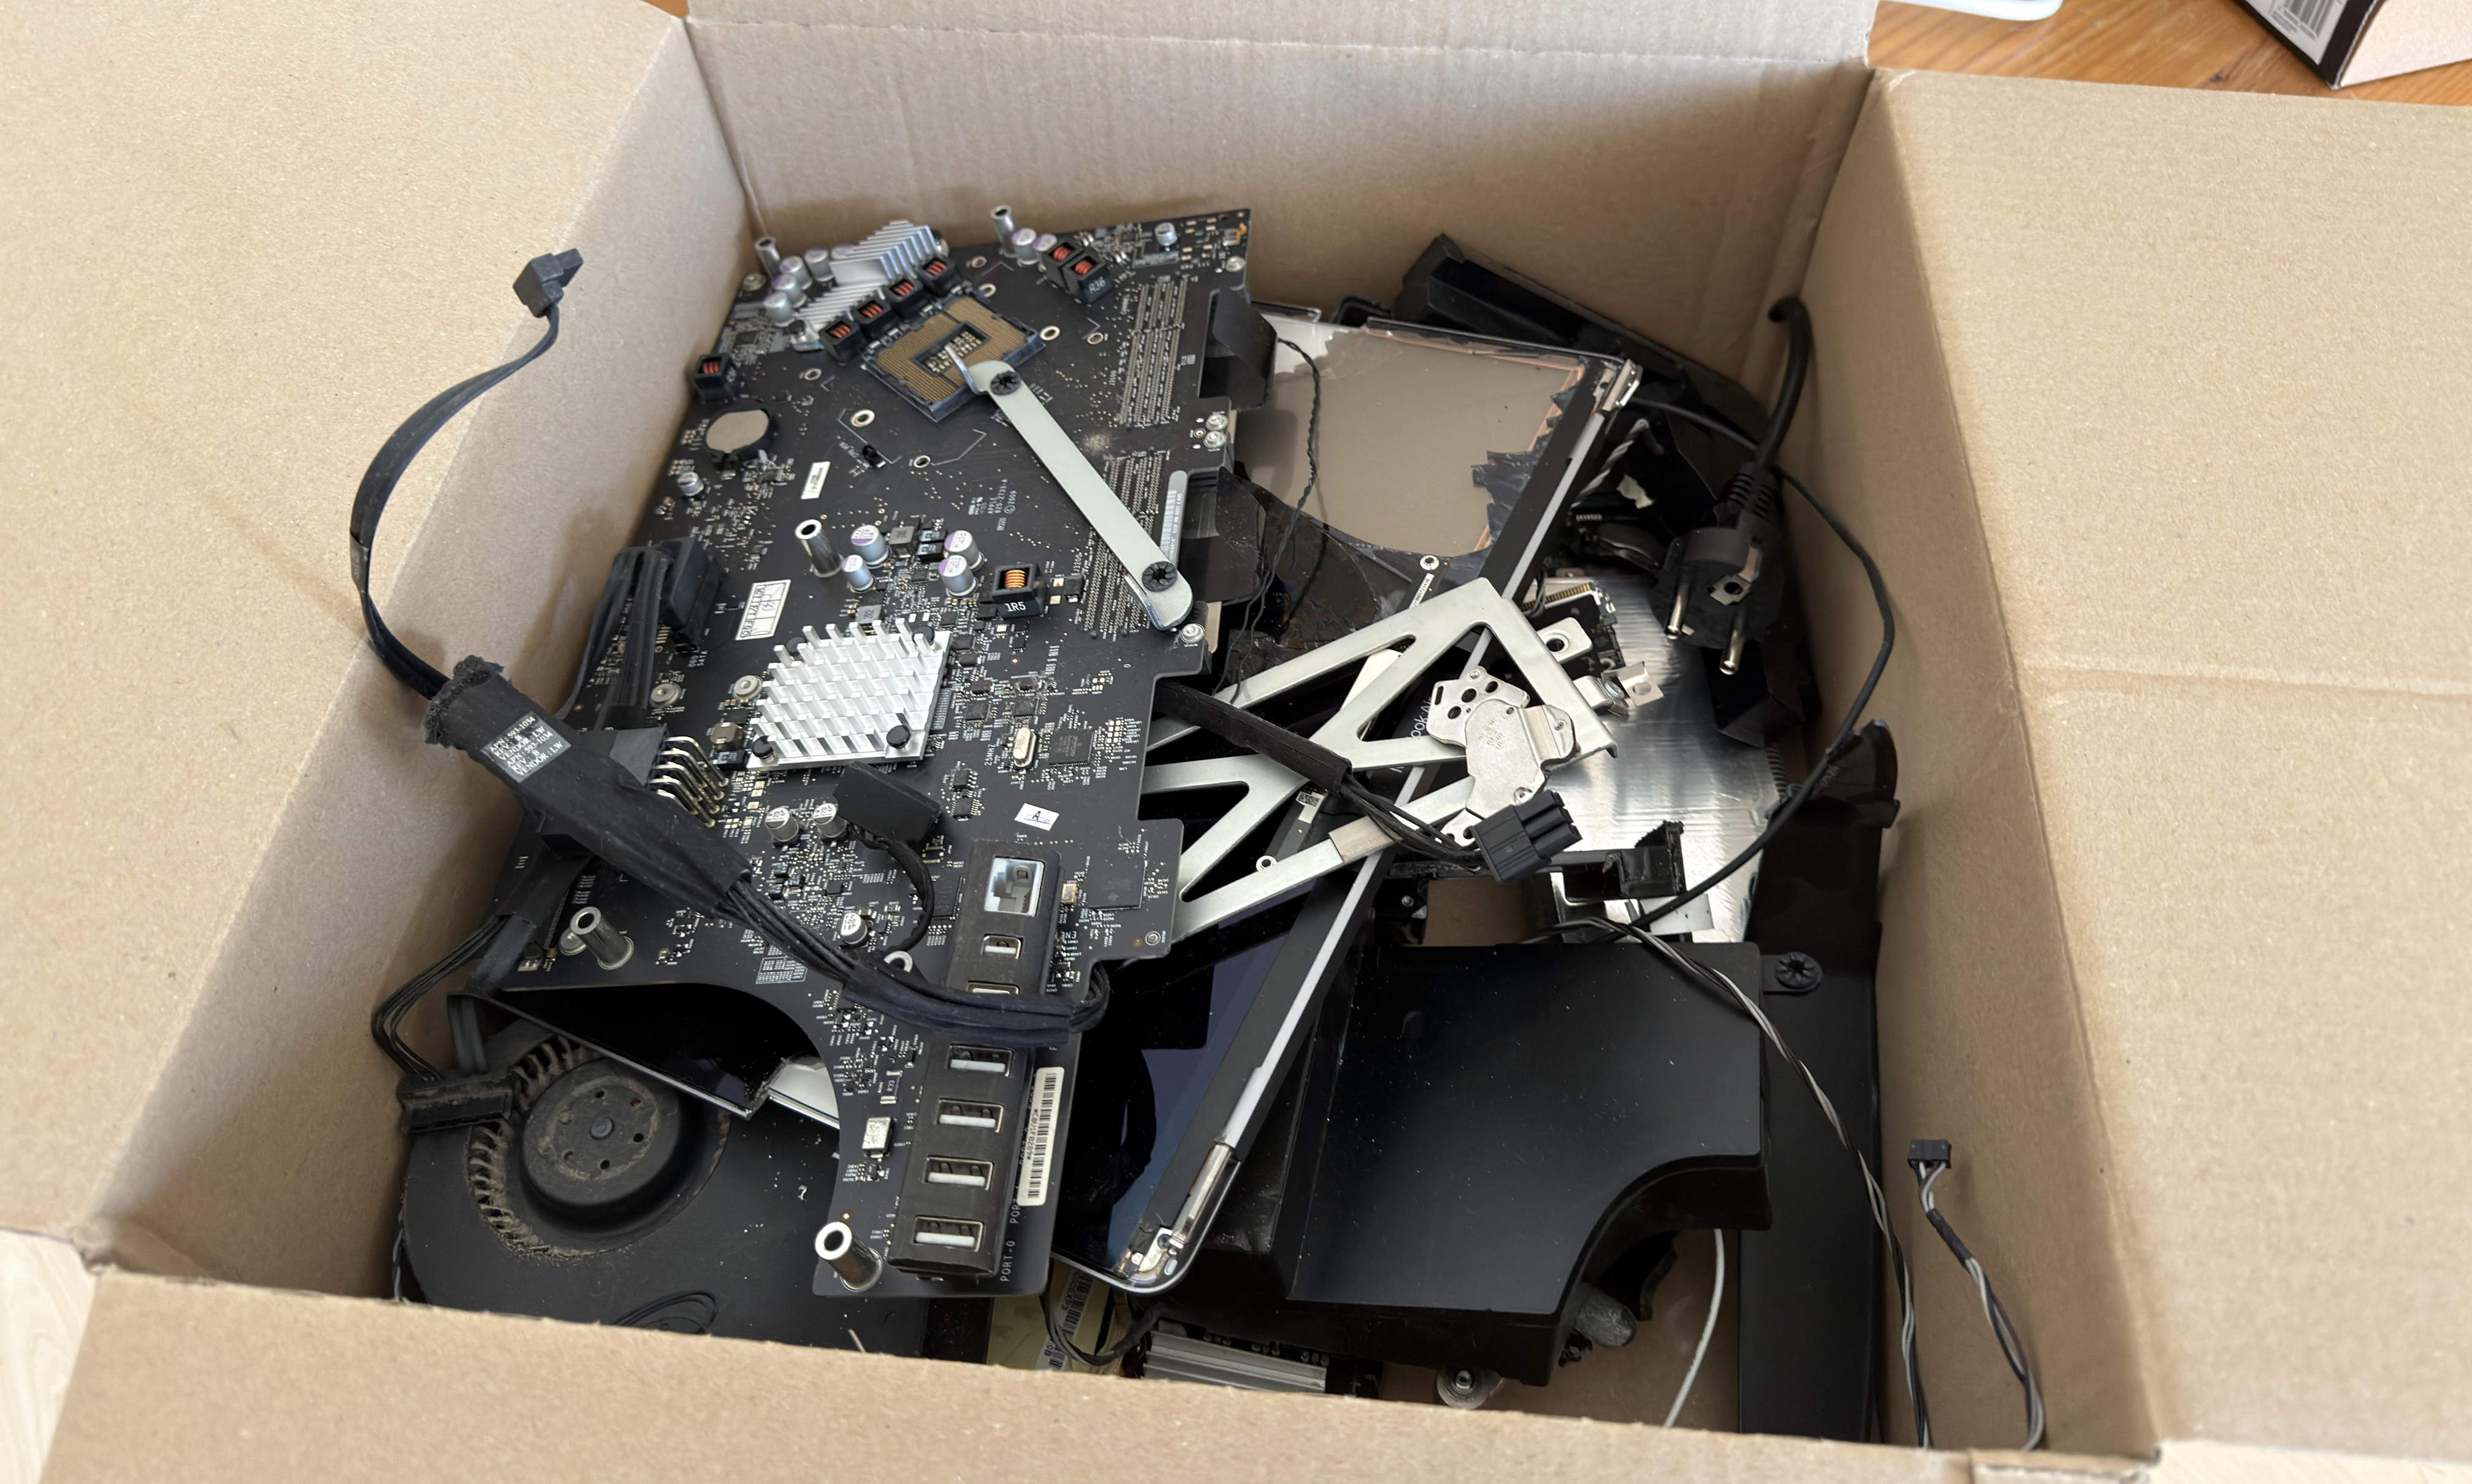 The old components of the iMac can be disposed of at the recycling yard
After the panel is removed, you should look up the model number on its back. Use this number to order a display controller for this panel, for example on AliExpress or Ebay. You absolutely have to order a controller that matches the model number of the panel.
The old components of the iMac can be disposed of at the recycling yard
After the panel is removed, you should look up the model number on its back. Use this number to order a display controller for this panel, for example on AliExpress or Ebay. You absolutely have to order a controller that matches the model number of the panel.
Then loosen all screws of all components and boards in the housing and remove everything. You should not touch the tilt mechanism with which the iMac is attached to the stand, as well as the power connection.
Caution is required when removing the power supply, because high voltages could remain here for a longer time after disconnecting from the power.
MacBook Air
Be more careful when disassembling the MacBook Air, because nothing should break here. You need the logic board, the speakers, the microphones, the USB board, the board with the headphone jack and the antennas (WLAN, Bluetooth). Only the battery, trackpad, keyboard and display are no longer needed. When disassembling, it is best to follow the instructions on ifixit, which describes this in great detail.
One could think that omitting the microphones, speakers and the board with the headphone jack world work as well, because you could also connect speakers and microphones via USB. However, the MacBook Air M1 has sensors built into the cables to the microphones (which stick to the right speaker) and the left speaker that detect whether the display is open or closed. And these sensors are very important once the internal MacBook display is no longer present.
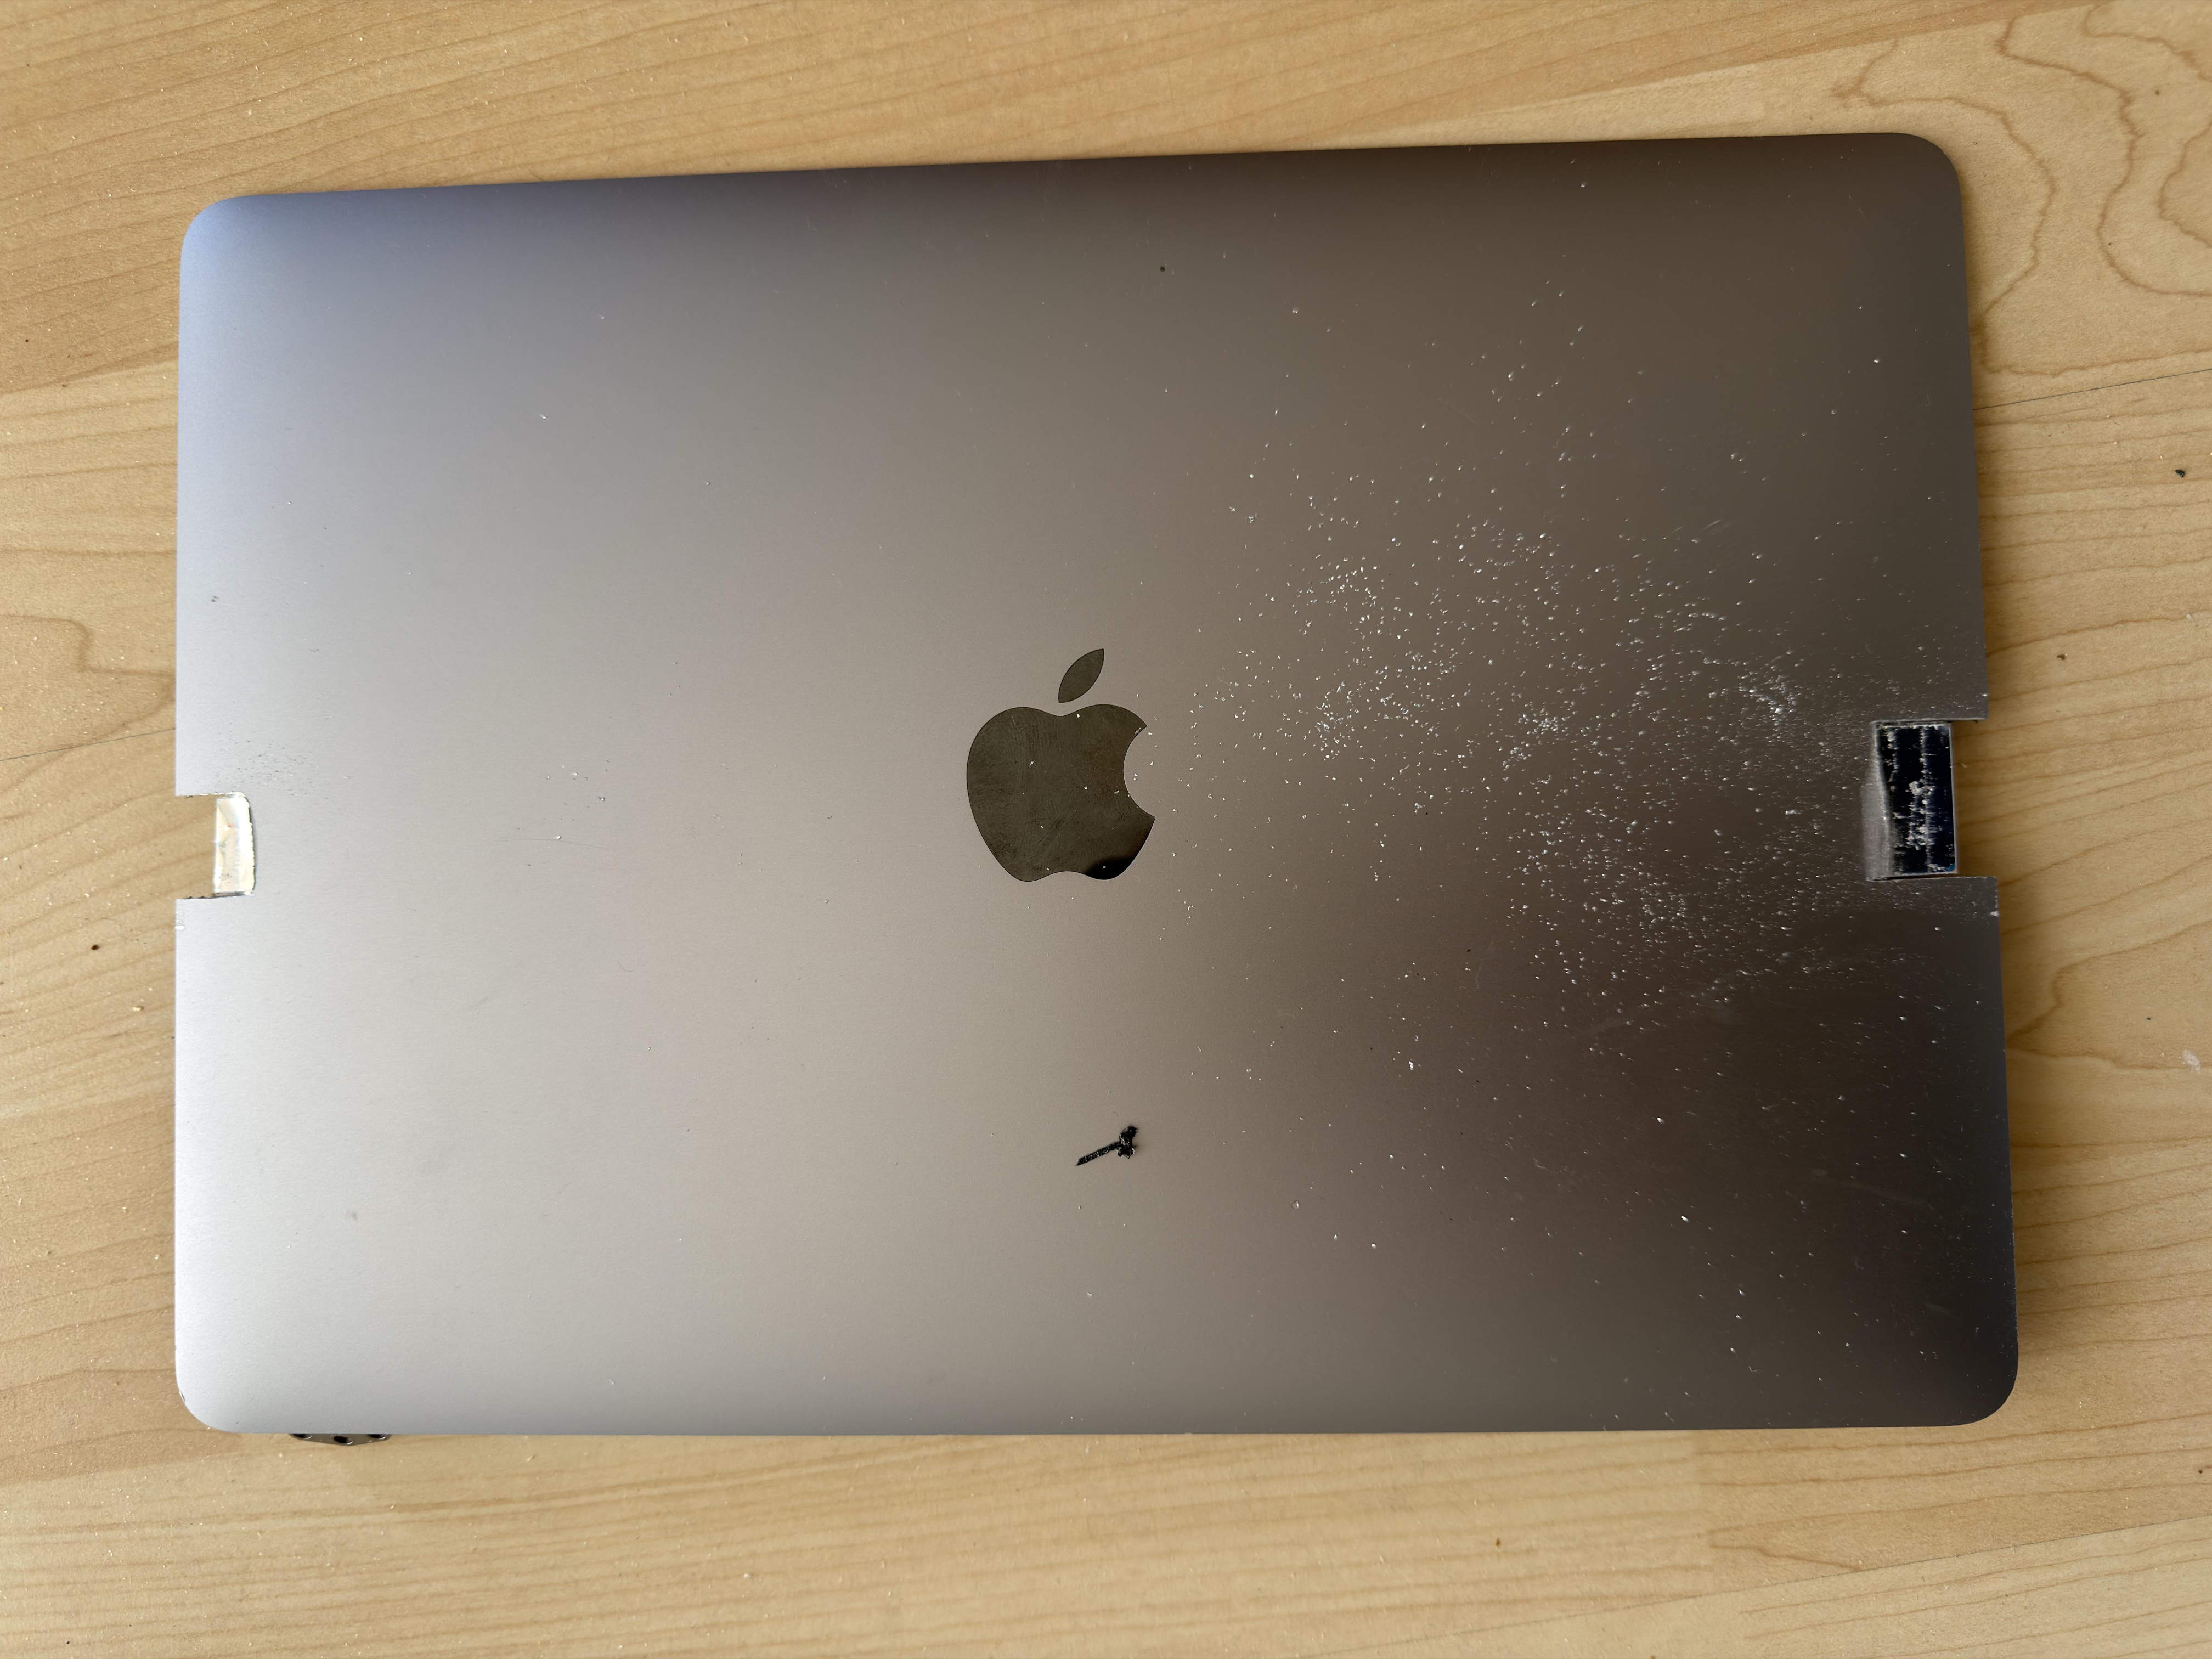 Sawed-out magnets
Without these sensors, the MacBook assumes that the display is opened and will always use the (no longer existing) internal display as the main screen.
But the MacBook must assume that the display is closed, because only then does it use a connected external display (in our case the one of the iMac) instead of the internal one. These sensors work via magnetic fields.
Magnets are installed in the display approximately in the middle of the left and right edges, which signal a closed display when they come close to the sensors. This means that in our DIY iMac, magnets must also be placed near both sensors so that the MacBook Air actually uses the iMac display as the main display. If you don't have magnets at hand, you can use the ones from the MacBook display. The exact position of the magnets is easy to find by driving a metal screwdriver along the edge of the display until you feel the attraction of the magnet. Unfortunately, the magnets are firmly integrated in the display housing and cannot be released, so I simply sawed them out of the display cover and then glued them to the sensors.
Sawed-out magnets
Without these sensors, the MacBook assumes that the display is opened and will always use the (no longer existing) internal display as the main screen.
But the MacBook must assume that the display is closed, because only then does it use a connected external display (in our case the one of the iMac) instead of the internal one. These sensors work via magnetic fields.
Magnets are installed in the display approximately in the middle of the left and right edges, which signal a closed display when they come close to the sensors. This means that in our DIY iMac, magnets must also be placed near both sensors so that the MacBook Air actually uses the iMac display as the main display. If you don't have magnets at hand, you can use the ones from the MacBook display. The exact position of the magnets is easy to find by driving a metal screwdriver along the edge of the display until you feel the attraction of the magnet. Unfortunately, the magnets are firmly integrated in the display housing and cannot be released, so I simply sawed them out of the display cover and then glued them to the sensors.
Conclusion: Almost all components of the MacBook have to migrate into the iMac: In addition to the logic board, these are WLAN/Bluetooth antenna, speakers, headphone board and the microphones. The only components that are no longer needed would be the battery, the internal display as well as keyboard and trackpad.
The Touch ID sensor can also be used. Its connection cable is screwed to the headphone board. If this is loosened, you can simply lift the sensor on the keyboard side.
Assemble the new iMac
When assembling, it is best to proceed in two stages.First, you should temporarily connect the display controller with the power supply and panel and check whether the iMac display works correctly as an external monitor. Connecting these components should not be too difficult. In principle, the display controller should be connected to the panel with two cables (one for the display data and one for the backlight) as well as with a power supply. The display controller provides various connections for connection to a computer (HDMI, Display Port etc.) which you should use to connect it to a computer. If everything works, you can find suitable places in the iMac case to accommodate the display controller and power supply. Of course, you have to make sure that the controller is placed where the cables can be easily routed to the panel. The left half of the iMac case should be best, the right side is better suited for the components of the MacBook.
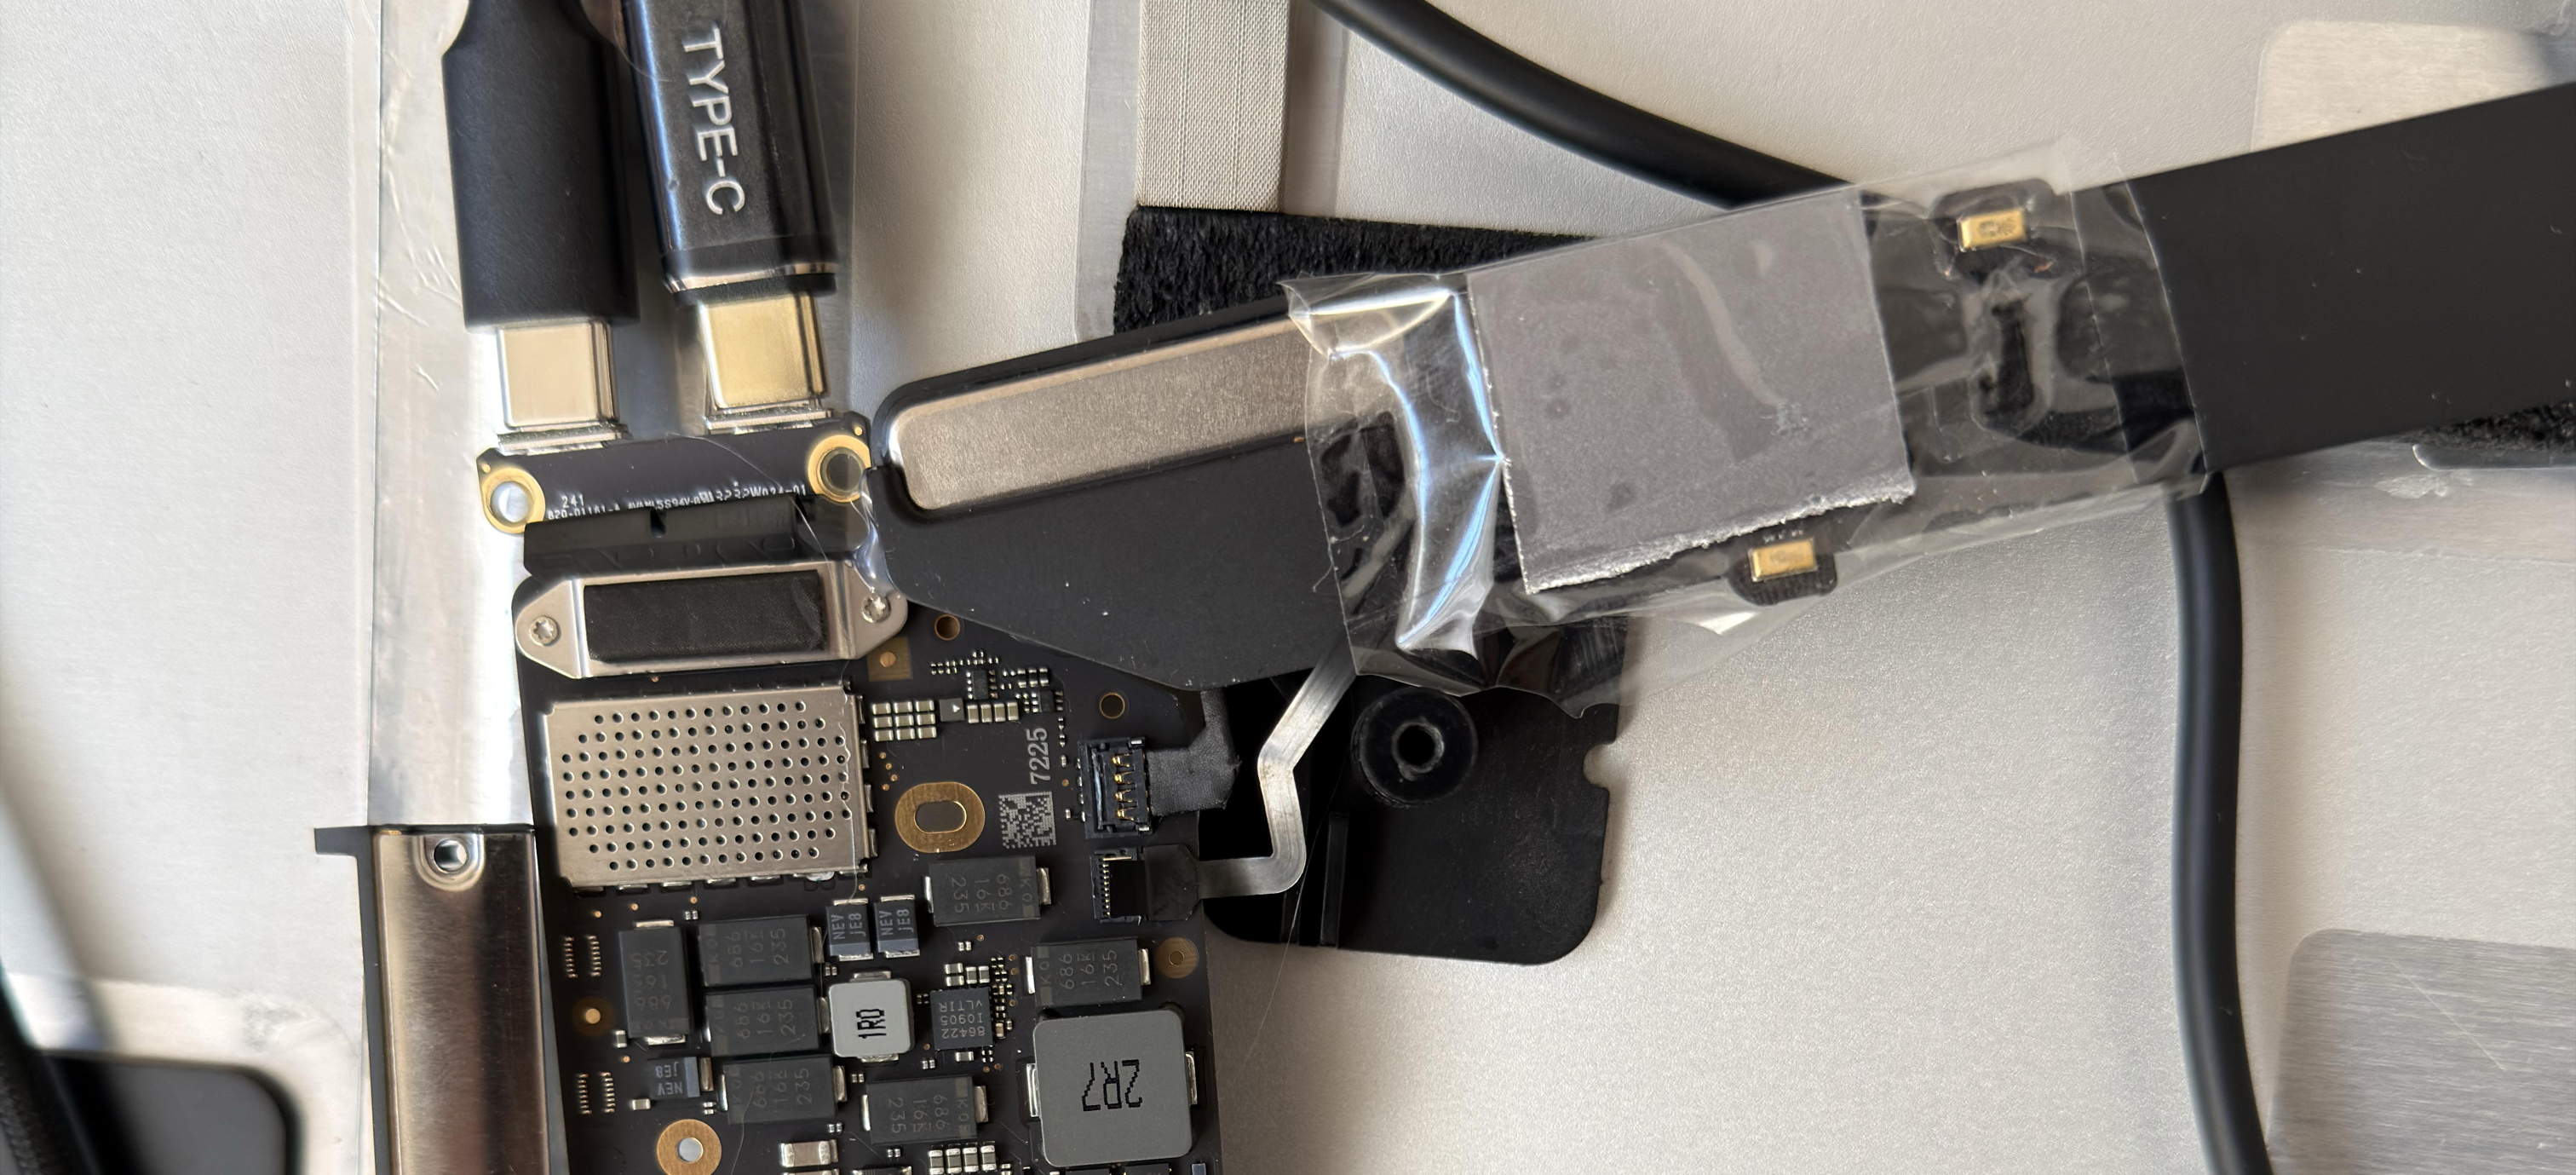 The (right) speaker of the MacBook protrudes to the right, the cable with the microphones (which shimmers gold where the microphones are located). The display sensor is covered with a magnet that was sawn out of the display cover
Afterwards you should reconnect all components of the MacBook Air (Logicboard, speakers, antenna, headphone board, USB board, microphone), connect one of the USB connections to a USB power supply, the other to an external display. If the power supply is connected to the power, the Mac should start (startup chime) and show the login screen on the display. If the latter does not happen, the sensors (the ones that are supposed to signal a closed display) may not yet detect a magnetic field, in which case you should hold magnets to both sensors so that the login screen becomes visible (both sensors must always detect a magnetic field). If you have done this, it is best to glue both magnets to the sensors so that a closed display is permanently detected.
The (right) speaker of the MacBook protrudes to the right, the cable with the microphones (which shimmers gold where the microphones are located). The display sensor is covered with a magnet that was sawn out of the display cover
Afterwards you should reconnect all components of the MacBook Air (Logicboard, speakers, antenna, headphone board, USB board, microphone), connect one of the USB connections to a USB power supply, the other to an external display. If the power supply is connected to the power, the Mac should start (startup chime) and show the login screen on the display. If the latter does not happen, the sensors (the ones that are supposed to signal a closed display) may not yet detect a magnetic field, in which case you should hold magnets to both sensors so that the login screen becomes visible (both sensors must always detect a magnetic field). If you have done this, it is best to glue both magnets to the sensors so that a closed display is permanently detected.
If the MacBook Air works correctly, the installation of all components in the iMac case can begin.
Placement of components
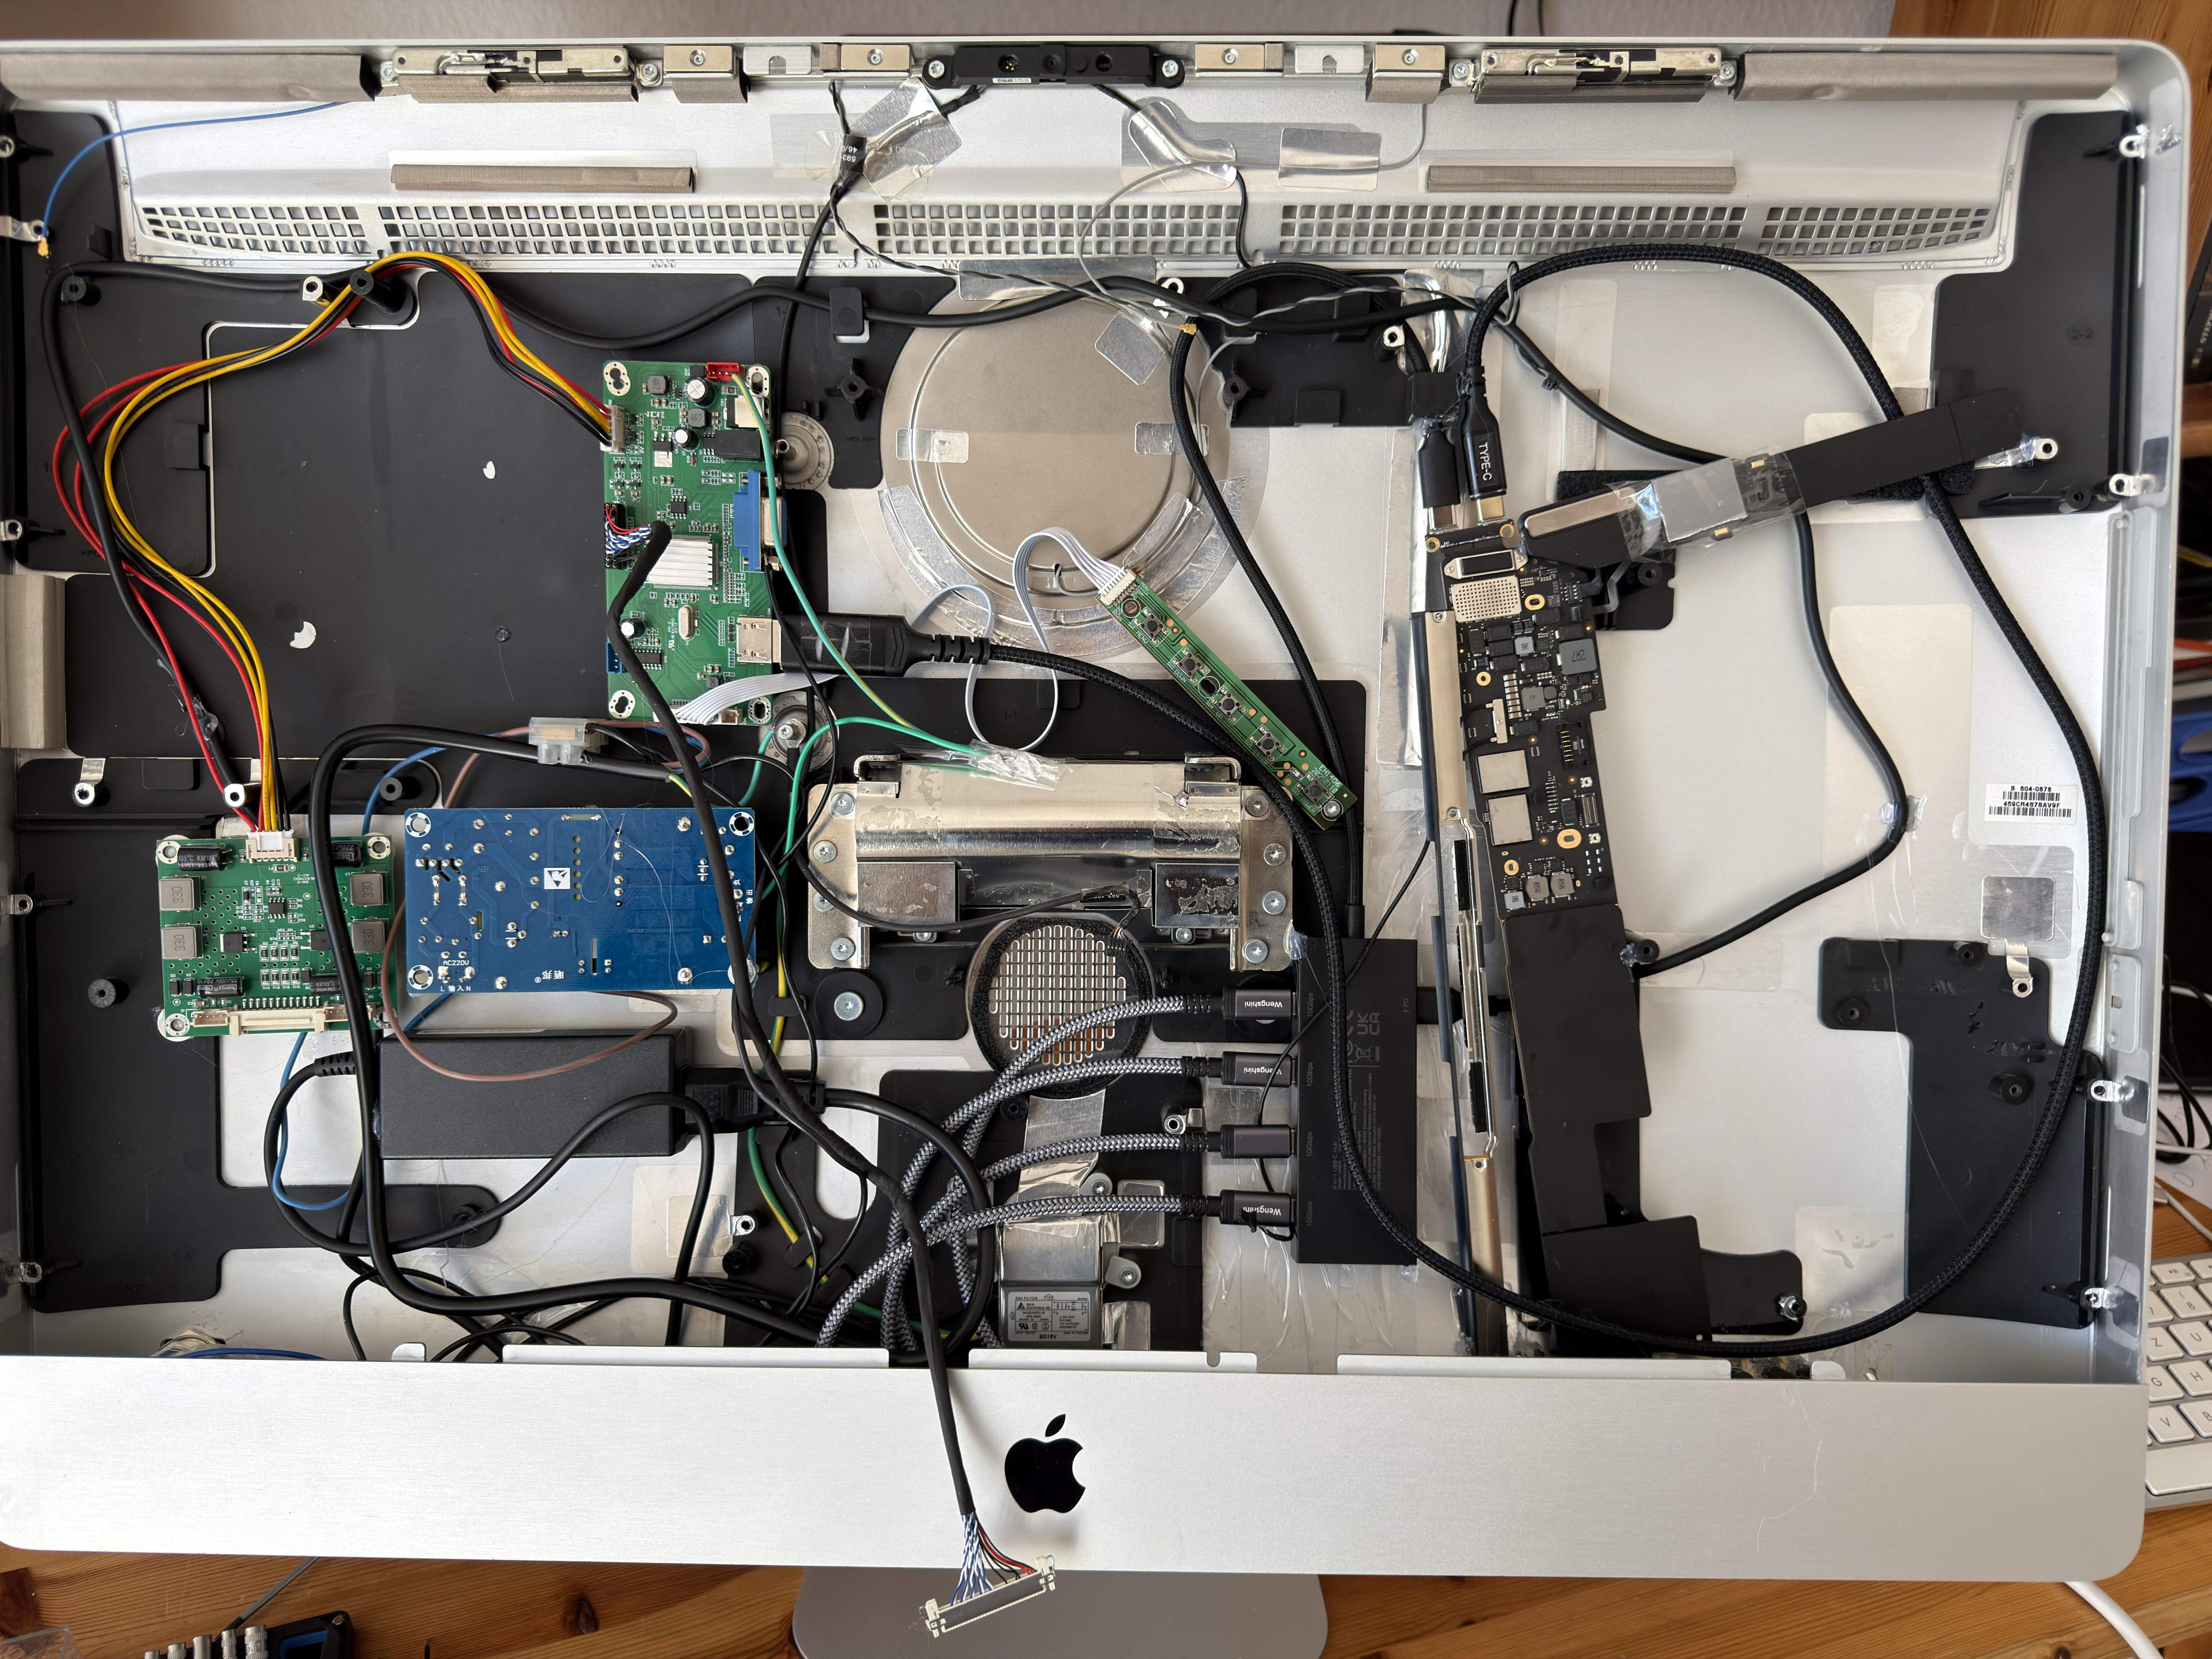 Placement of all components
The placement of the components can be complicated, especially if you want to have the Touch ID sensor accessible from the outside. The problem is the extremely sensitive and filigree cable connections between the MacBook components. These are so small and thin that you can not extend them with the tools available for normal hobbyists. That is, the entire structure must ultimately be accommodated in the original configuration, as it was also aligned in the MacBook itself.
Placement of all components
The placement of the components can be complicated, especially if you want to have the Touch ID sensor accessible from the outside. The problem is the extremely sensitive and filigree cable connections between the MacBook components. These are so small and thin that you can not extend them with the tools available for normal hobbyists. That is, the entire structure must ultimately be accommodated in the original configuration, as it was also aligned in the MacBook itself.
It turned out that it was easier (for me) to attach and connect everything together before actually putting the whole structure into the iMac case. It is difficult to get to the tiny plug-in connections, which also have to be screwed with microscopic screws, if these components are already placed within the iMac.
However, before the MacBook components are finally installed, the USB-C extension cables must first be laid to the openings to the former USB-A ports, so that the DIY iMac later also has sufficient USB ports for peripherals outside. The "thick" housing of the old iMacs is optimal here, as USB extension cables usually have quite long handles, which just find space in the lower part of the iMac case after their socket has been pushed through the housing openings. With the help of wooden strips and some hot glue the USB extension cables were firmly glued into the existing openings in the housing.
Afterwards the logic board and the other MacBook Air components could be placed in the housing and attached.
Since I wanted to use the Touch ID sensor, it somehow had to be placed in one of the openings of the former connections of the iMac. With a lot of effort, the touch sensor could be placed in the opening of the former Ethernet connection (and fixed with hot glue), so the logic board had to be installed vertically, the two speakers then aligned to the right. Especially in the bottom right part of the iMac case it became extremely tight (a speaker and the USB extension cables dispute over the space). So a lot of sensitivity is needed here, and hot glue, which keeps all components in place.
After the MacBook is installed, the USB hub is connected to the MacBook's logic board and the USB extension cables.
This is followed by the installation of the USB power supply, which supplies the USB hub with power, which in turn supplies the MacBook.
Now all you have to do is plug the display controller into the remaining USB port of the MacBook with an HDMI to USB cable. All components are now connected to each other.
I use the normal existing power connection of the iMac to power the device. In the housing, the existing power cable can be connected to the new switch (to turn the computer on or off) and then forwarded to the two power supplies (for display controller and MacBook/USB hub). In my case, the new on/off switch was slightly too thick for the existing recess of the old switch, so the opening had to be widened a little bit. The housing is already appropriately grounded by default and this should not be changed.
Finally, you have to connect the iMac display panel to the display controller, screw the panel back on, put the glass panel on, and the new iMac is ready.
Final product
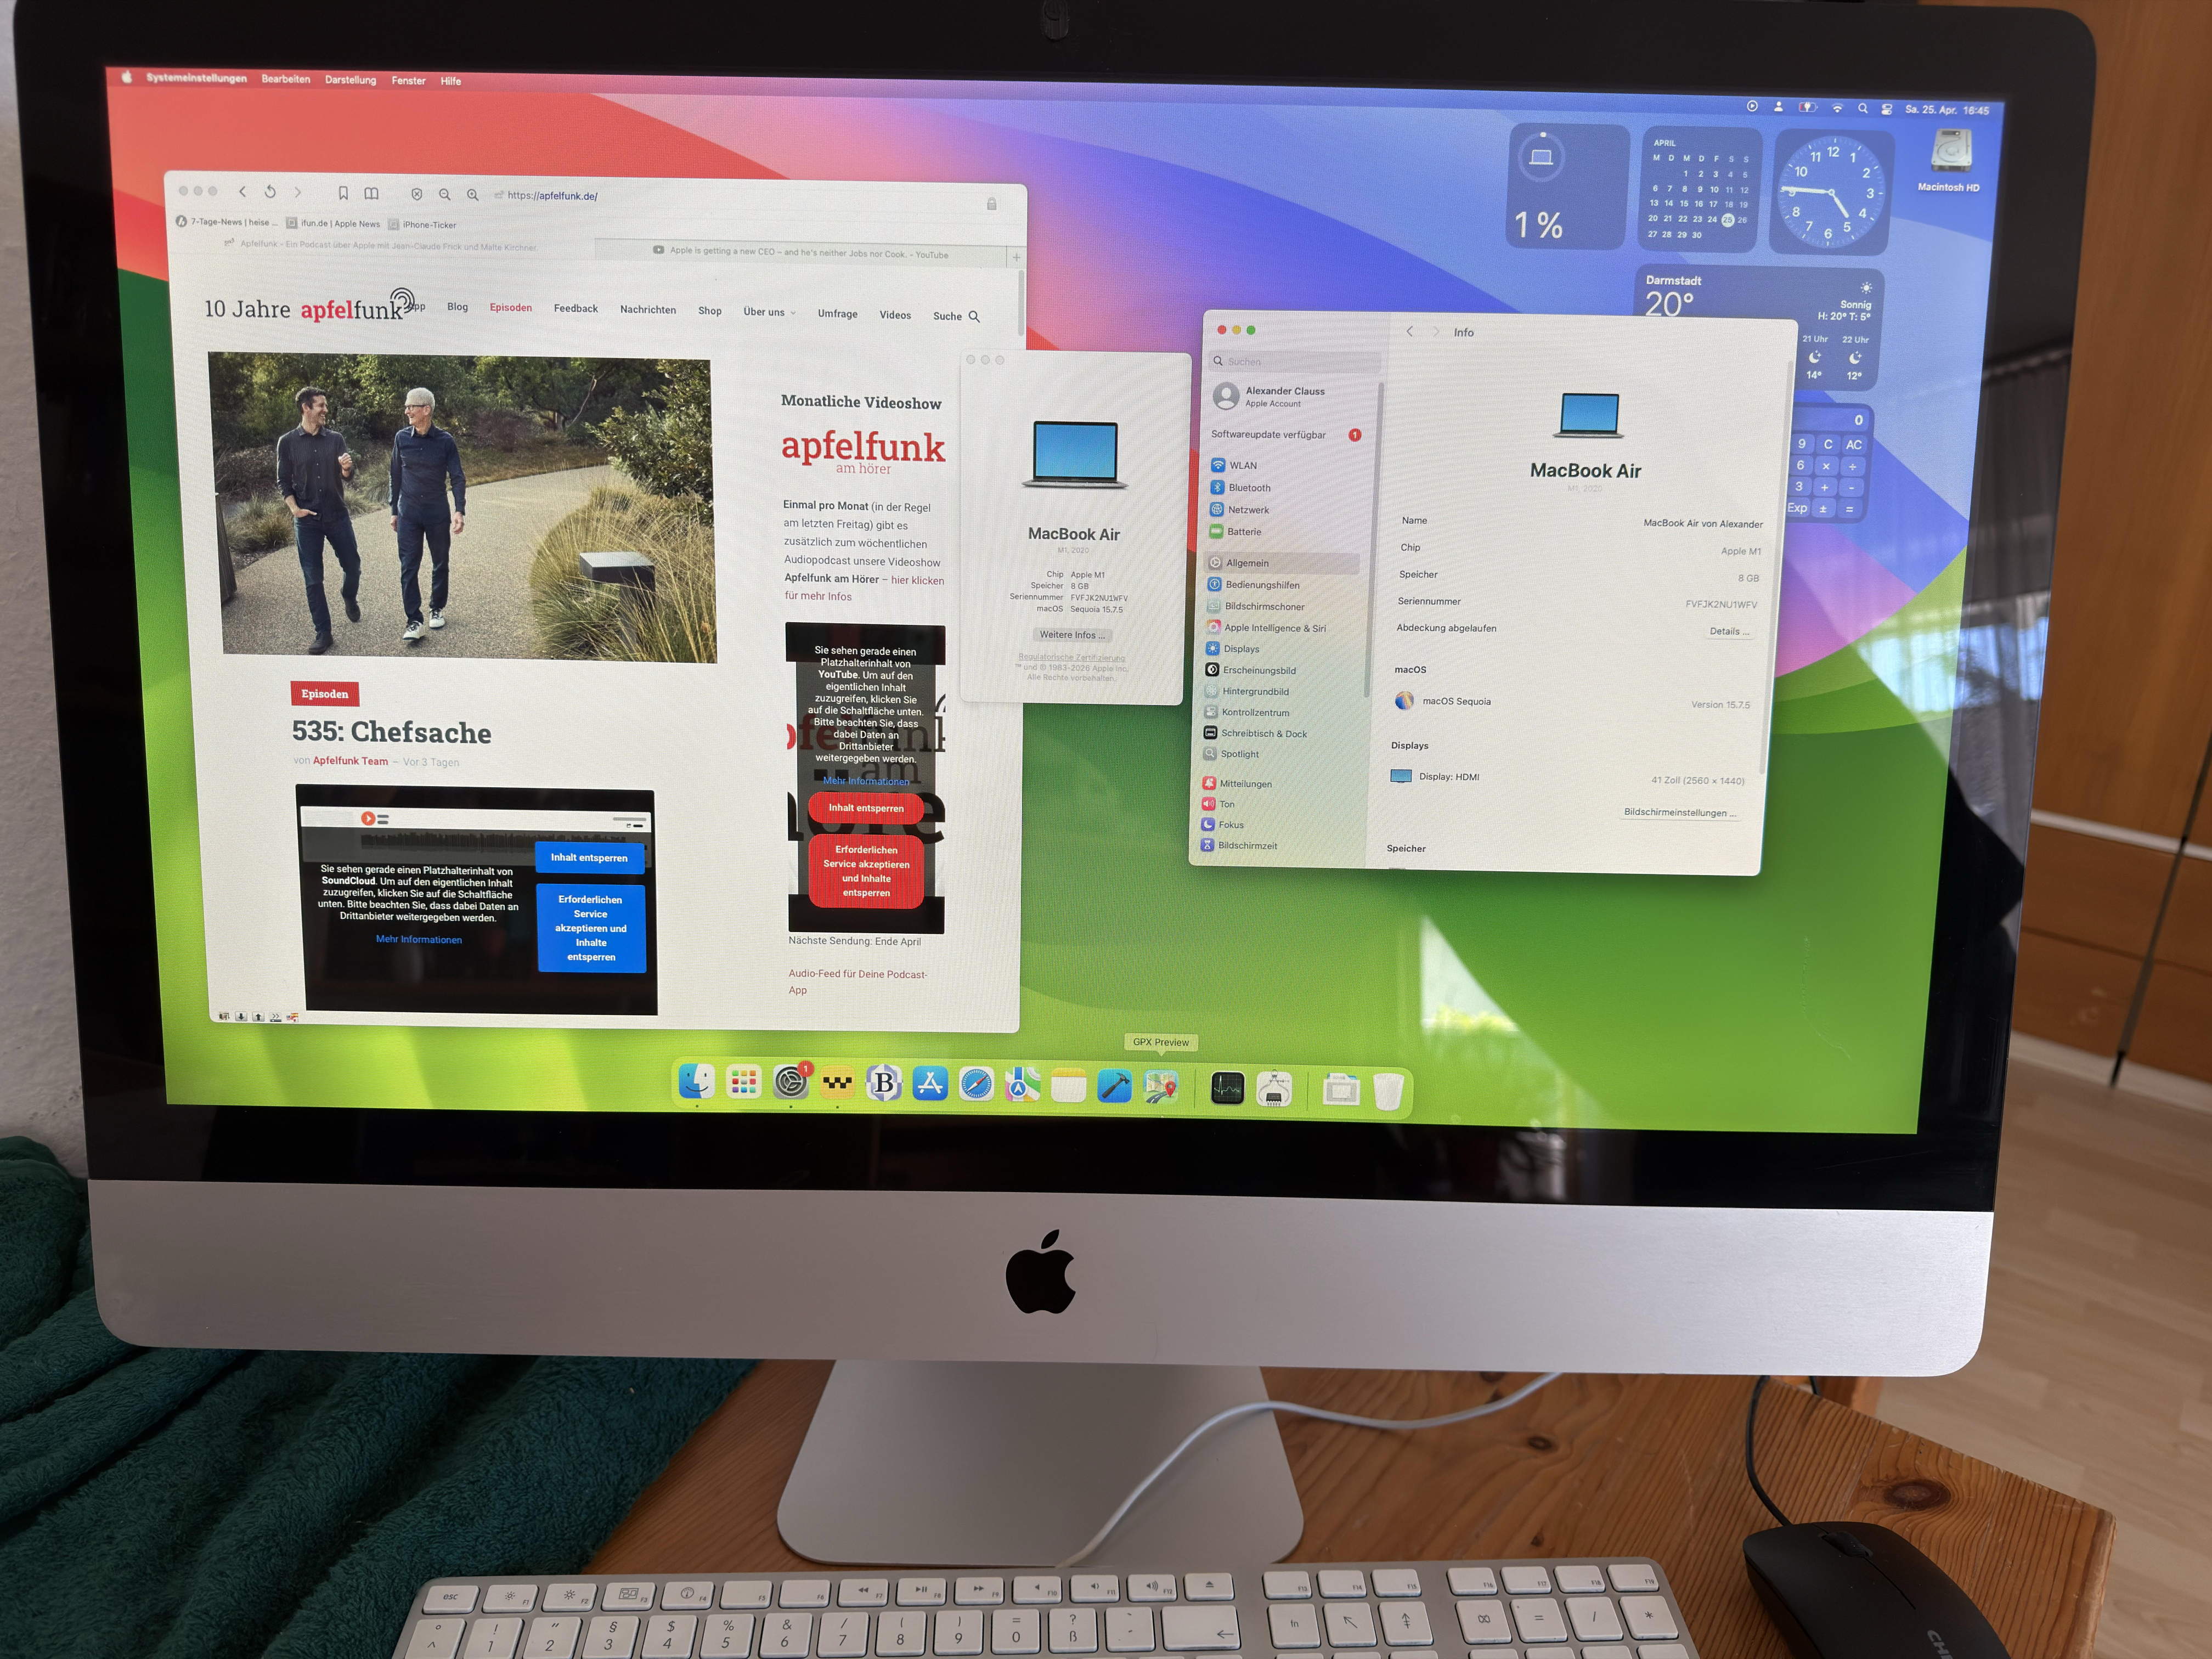 The DIY iMac in action
The result of the DIY project is a new iMac Air M1 27". It has the following specifications:
The DIY iMac in action
The result of the DIY project is a new iMac Air M1 27". It has the following specifications:
- Display: 2560x1440, 27"
- Processor: M1
- RAM: 8 GB
- SSD: 256 GB
- 4x USB-C (Back)
- Touch-ID (Back)
- Speakers
- No Webcam
Limitations
The Mac does not have a working webcam. The original camera of the iMac is still available, but there is no connection option to the logic board of the MacBook. The camera of the MacBook is permanently integrated into its display and cannot be easily removed and reused.The iMac can't be turned on again after shutting down (as you would do with the original MacBook by opening the display). After shutting down, you actually have to turn off the iMac completely (i.e. cut the power) via the on/off switch. After that, it starts normally when the power is switched on.
The audio quality is not optimal because the speakers of the MacBook are not in the best location within the iMac case. However, the result is still OK.
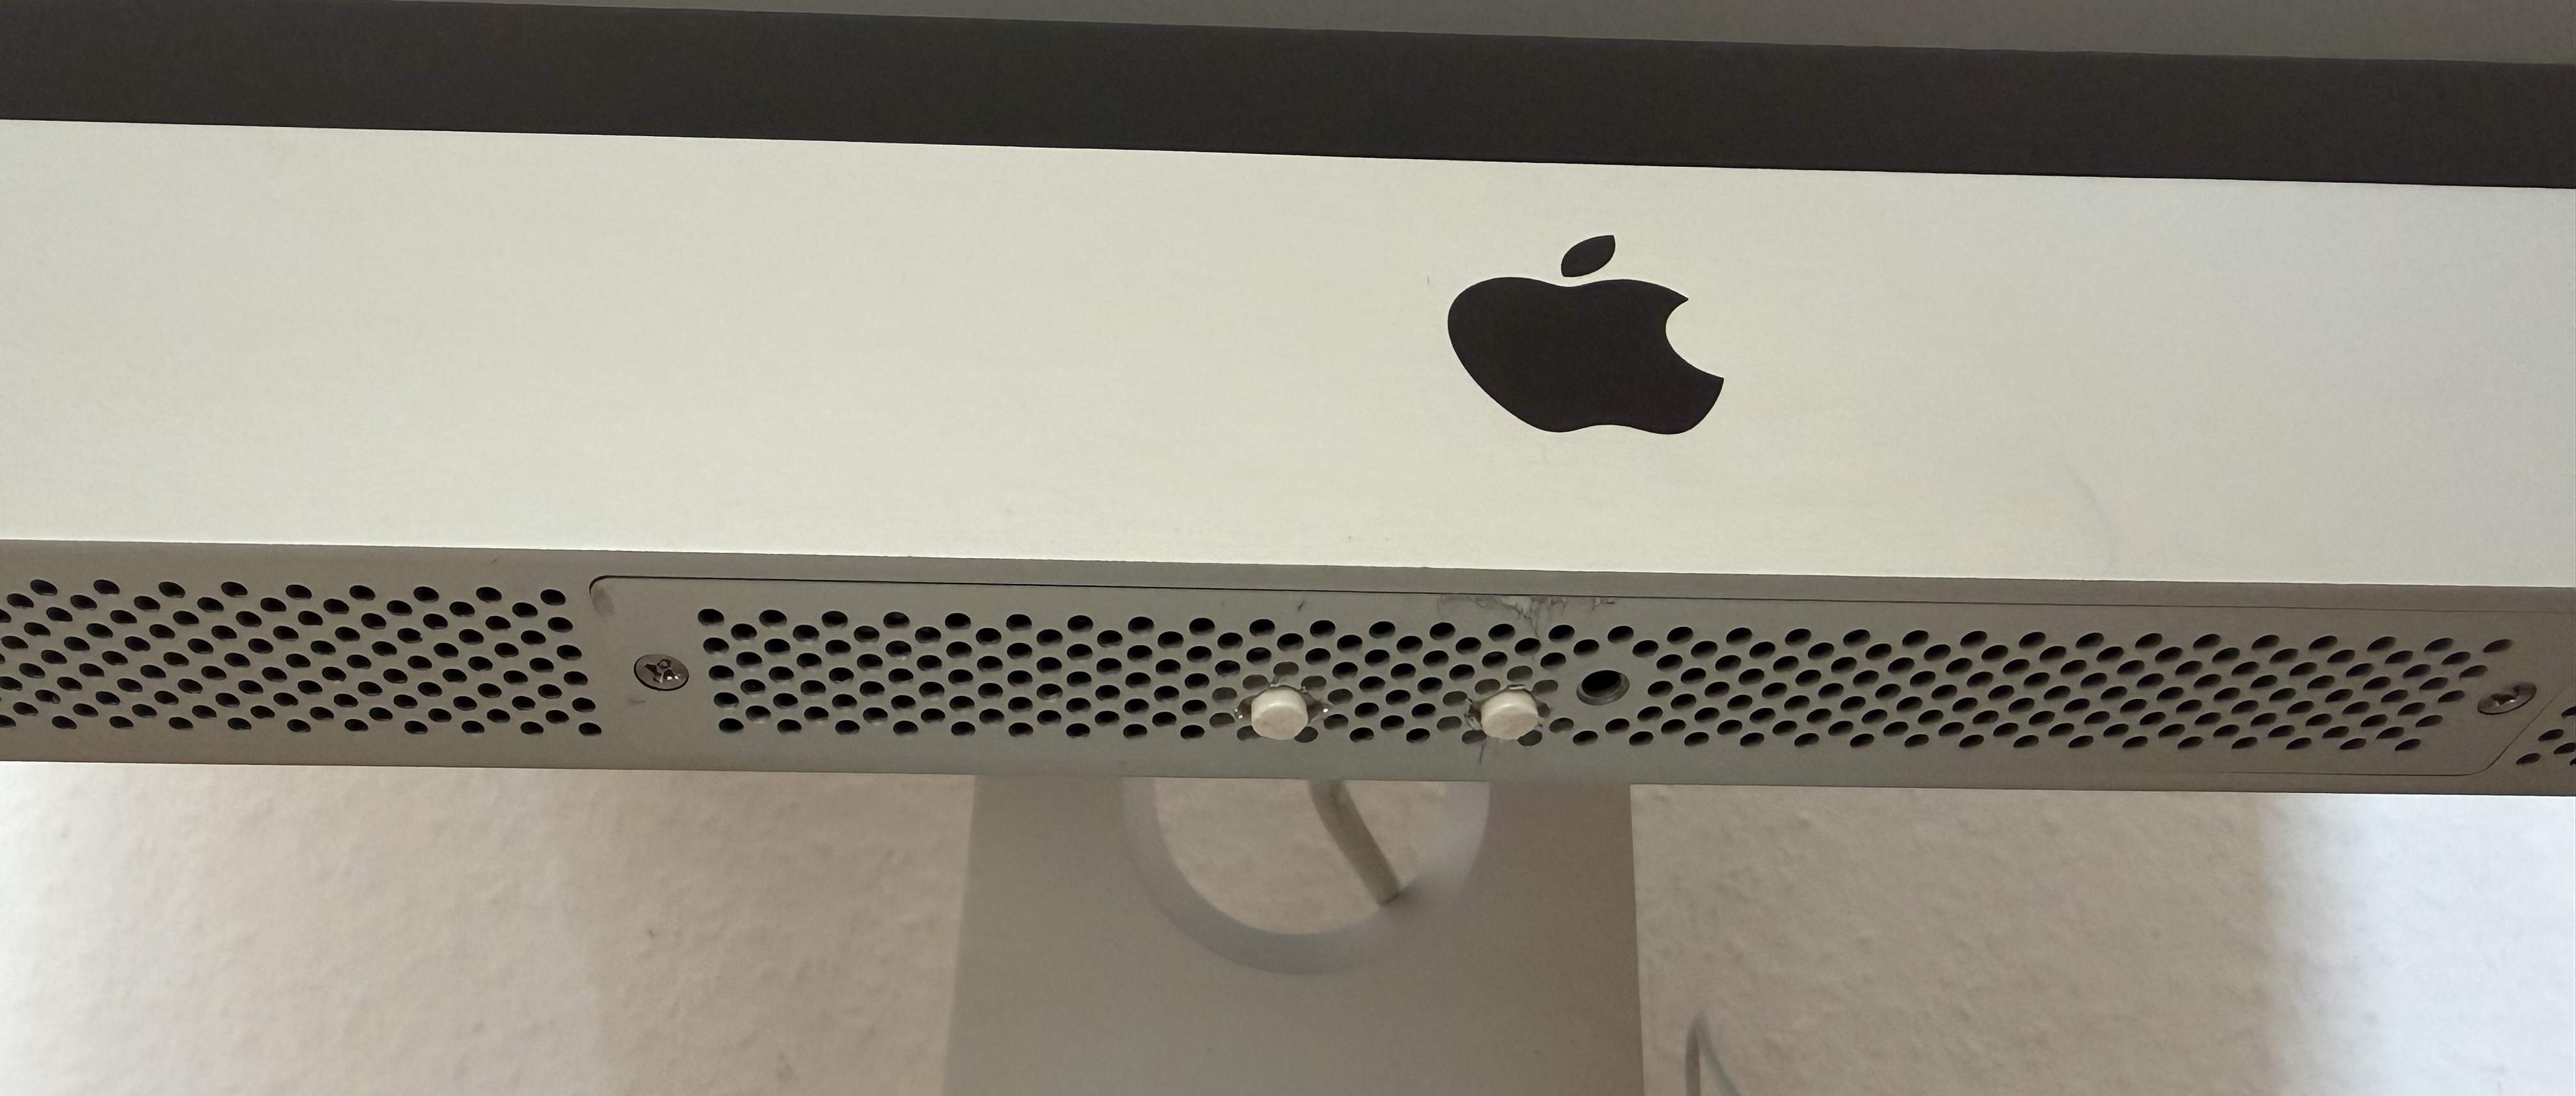 Brightness buttons in flap to RAM slot The display brightness can no longer be adjusted by software/keyboard, but the new display controller offers buttons to regulate brightness, contrast and many other display parameters. I have made these buttons accessible via the former RAM slot of the iMac, so they can be easily reached. So this is not a real limitation.
Touch-ID is functional in principle, but can no longer be easily accessed via the keyboard. Instead it can be found at the back of the former Ethernet port. With a little practice you can reach it easily here as well. Unfortunately, it turned out that the macOS gets in the way when you actually want to use TouchID. This is a pure software problem, not a hardware problem. In the Touch ID settings you can scan and register any finger, which shows that the Touch ID sensor works great without problems. Nevertheless macOS no longer provides Touch ID to authorize login, ApplePay, etc. The macOS assumes that the display is closed and thus the Touch ID sensor would not be accessible. But since macOS doesn't mind to register fingers for Touch ID, the problem could theoretically be resolved with a software patch.
Because of the missing battery, the Mac forgets the current date and time when turned off. Desktop Macs have a very small (non-chargable) battery to keep the internal clock running while not connected to a power supply, mobile Macs just use the normal battery, which my DIY iMac no longer has. However, this is not a real problem, because after booting the Mac connects to the Internet anyway and immediately retrieves the current time.
Update after a few weeks of using the new Mac
You might not notice it during everyday tasks, but it turns out that macOS limits processor performance on mobile Macs with Apple Silicon as soon as the battery charge falls below a certain threshold—even when a sufficiently powerful power adapter is connected. In the Geekbench benchmark, the single-core performance always scores a perfect score, but as soon as the processor is under full load and using all cores, macOS throttles it when battery capacity is low, and the Geekbench result shows only half the score.So, just to test it out, I installed the battery inside the iMac case, and as a result, Geekbench now scores the maximum points in the multicore test as well. However, this reveals another quirk of macOS, which switches on portable Macs only when their display is opened, not simply by connecting a power source — at least as long as the battery is present. So I had to find a way to mount one of the magnets (which simulates a closed display so the Mac uses the external display) in a way that allows it to move to/from the display sensor. Using a simple mechanism accessible from the outside (in my case, through the slot for the CD drive), the magnet can be briefly lifted away from the display sensor; this signals to the Mac that the display is open, and it then turns on.
If you don't need full performance, I'd probably continue to use the Mac without the battery. For normal, everyday tasks, the performance throttling when the battery is removed is virtually negligible, and you can save yourself the trouble of dealing with the extra mechanism needed to lift the magnet. If you don't want to sacrifice full multi-core performance, you might want to experiment with an electromagnet instead of the additional mechanism. When connected to the Mac's power supply, the electromagnet could automatically simulate a brief opening of the display to turn the Mac on, without requiring you to do so manually with a second mechanism.
During normal use, the new mechanism for the magnet also allows you to work around the Touch ID issue described above. Since macOS on portable Macs doesn’t even attempt to use Touch ID (except when setting up TouchID) as long as the display is closed, you can use the new mechanism to simulate opening the display and then actually use Touch ID successfully. However, the Mac then switches to the "internal" display (since the MacBook M1 can only support one display at a time), so you can't see what's happening there. But since all you have to do is place your finger on the sensor, it's actually something you can live with.
Last words
The DIY iMac could be extended with some additional features.Since the old iMac still has openings in the housing for a CD/DVD drive and an SD card reader, you could also install corresponding devices and connect them via the internal USB hub. You could also extend the headphone jack of the MacBook to the corresponding opening of the iMac case and so connect external speakers or headphones.
There would also be room for an additional SSD to expand the storage of the MacBook.
So there are still options for expansion.